Introduction
Forget everything you thought you knew about traditional burger patties. The smash burger isn’t just a trend; it’s a revelation—a technique that transforms a simple ball of ground beef into a thin, gloriously crispy-edged, and unbelievably juicy patty in mere minutes. Born from diner counters and now perfected on home griddles, the smash burger delivers an unparalleled textural and flavor experience. By firmly pressing a loosely formed beef ball onto a scorching hot griddle, you create maximum surface contact, leading to the development of a dark, flavorful crust known as the Maillard reaction. This crisp exterior locks in the juices, ensuring a tender, moist interior. Stacked with melty cheese, fresh toppings, and nestled in a toasted bun, the smash burger is pure, unadulterated burger bliss. This comprehensive guide will equip you with all the knowledge, techniques, and tips to consistently craft perfect smash burgers that will rival (and often surpass) your favorite burger joint. Get ready to embark on a culinary journey that promises crispy edges, juicy centers, and flavor explosions in every single bite!
Ingredients
The beauty of a smash burger lies in its simplicity, making quality ingredients paramount. Each component plays a crucial role in building the ultimate burger experience.
-
For the Patties (The Star of the Show):
-
2 lbs Ground Beef (80/20 Chuck is ESSENTIAL): This fat-to-lean ratio is critical for the smash burger. The fat renders, creating steam that cooks the interior while the lean meat sears. Leaner beef will result in dry, tough patties. Freshly ground beef is ideal.
-
Salt and Freshly Ground Black Pepper: The only seasonings truly needed for the beef itself. Apply generously just before smashing.
-
-
For the Griddle & Cooking:
-
2-3 tablespoons High Smoke Point Oil: (e.g., avocado, canola, vegetable oil) for lightly oiling the griddle. Avoid olive oil due to its lower smoke point.
-
Optional: 1-2 tablespoons Unsalted Butter: For basting or finishing (adds richness).
-
-
For the Cheese (The Melty Hug):
-
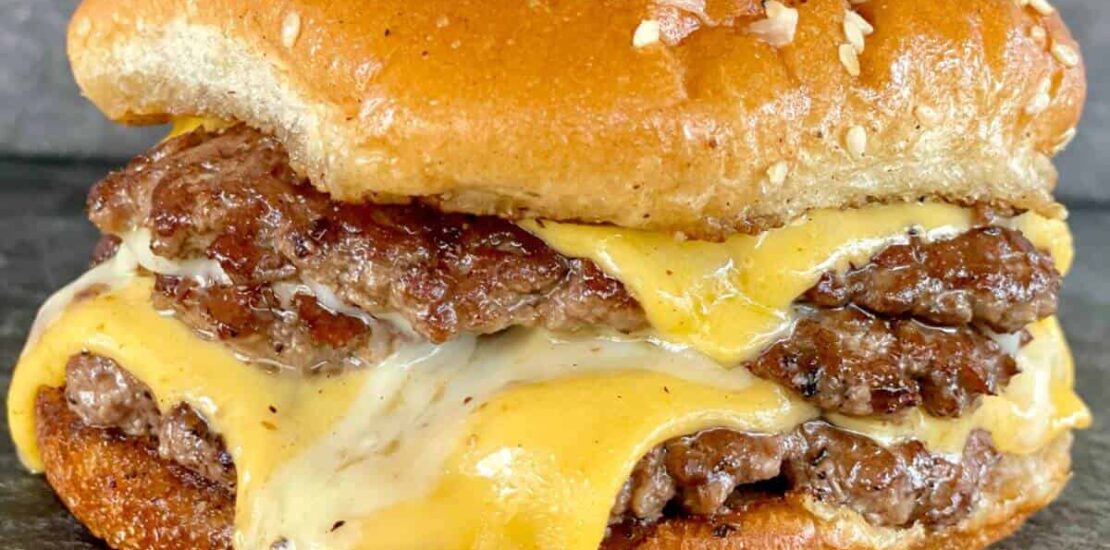
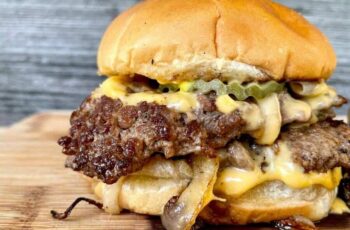
8-12 slices American Cheese: The undisputed king for smash burgers due to its unparalleled melting properties and creamy texture.
-
Alternatively, sharp cheddar, provolone, or Swiss can be used if preferred, but American is classic.
-
-
For the Buns (The Toasted Vehicle):
-
8-12 Potato Buns or Brioche Buns: Soft, slightly sweet buns that toast beautifully and hold up well to the juicy patties. Avoid overly crusty or thick buns.
-
2-3 tablespoons Unsalted Butter, melted: For buttering and toasting the buns.
-
-
For the Classic Toppings (Customize to Your Heart’s Content):
-
Lettuce: Iceberg or Romaine, shredded or whole leaves, for crispness.
-
Tomato: Thinly sliced ripe tomatoes.
-
Onion: Thinly sliced red onion (for a bite) or white/yellow onion (for milder flavor). Optional: Caramelized onions.
-
Pickles: Dill pickle slices or chips for a tangy crunch.
-
-
For the Sauces (The Finishing Touch):
-
Ketchup
-
Mustard (Yellow or Dijon)
-
Mayonnaise
-
Special Burger Sauce: (e.g., mix mayo, ketchup, relish, a dash of hot sauce, and a pinch of paprika).
-
How To Make Smash Burgers on the Griddle
Mastering the smash burger technique is all about precision and timing, transforming a simple patty into a crispy, juicy delight.
-
Prepare the Ground Beef:
-
Gently form the ground beef into loosely packed balls, about 2-3 ounces each (roughly the size of a golf ball or slightly larger, but not tightly compacted). Aim for 8-12 balls, depending on your desired patty size and whether you’re making single or double burgers. The key is to handle the beef as little as possible to avoid toughening it.
-
Place the beef balls on a plate or tray. Do NOT season them yet.
-
-
Prepare Buns and Toppings (Mise en Place):
-
Slice your burger buns in half horizontally.
-
Melt the butter for the buns in a small bowl.
-
Have all your cheese slices, fresh toppings (lettuce, tomato, onion, pickles), and sauces prepped and within easy reach of the griddle. Speed is key during cooking!
-
-
Preheat the Griddle:
-
Turn on your griddle (Blackstone is ideal!) and preheat it to medium-high to high heat (around 450-500°F / 230-260°C). You want it screaming hot.
-
Add a thin layer of high smoke point oil to the griddle surface and spread it around.
-
-
Toast the Buns:
-
While the griddle continues to heat, brush the cut sides of your burger buns generously with melted butter.
-
Place the buttered buns, cut-side down, on a slightly cooler section of your griddle (or reduce heat on one side) to toast until golden brown, about 1-2 minutes. Watch them carefully as they toast quickly.
-
Remove the toasted buns from the griddle and set aside.
-
-
Smash and Cook the Patties:
-
Increase the griddle heat back to high, if it was reduced. Add a fresh thin layer of oil to the primary cooking zone.
-
Place 2-4 (or as many as comfortably fit without overcrowding) of the loosely formed beef balls onto the hottest part of the griddle.
-
Immediately place a piece of parchment paper over each beef ball (this prevents sticking to your spatula/press).
-
Using a sturdy, flat metal spatula or a dedicated burger press, firmly and quickly smash each beef ball down into a thin patty (about 1/4 to 1/8 inch thick). Press down for 5-10 seconds to create maximum surface contact.
-
Remove the parchment paper.
-
Immediately season the tops of the smashed patties generously with salt and freshly ground black pepper.
-
-
Flip, Cheese, and Finish:
-
Let the patties cook undisturbed for 2-3 minutes. You’ll see the edges turn dark brown and crispy, and juices will start to bubble up through the top.
-
Using your spatula, scrape underneath each patty to lift it cleanly (the crust might want to stick, so be firm!). Flip the patties.
-
Immediately place a slice of American cheese on top of each cooked patty.
-
Cook for another 1-2 minutes, or until the cheese is beautifully melted, and the second side has also developed a nice crust. The internal temperature for ground beef should reach 160°F (71°C), which these thin patties achieve quickly.
-
Optional: For extra juicy burgers, in the last 30 seconds, you can add a tiny splash of water around the patties and cover them with a metal dome or lid to create steam, helping the cheese melt perfectly.
-
-
Assemble and Serve:
-
Working quickly (speed is key for hot smash burgers!), transfer the cheesy patties directly onto the bottom halves of your toasted buns.
-
Add your desired toppings and sauces.
-
Place the top halves of the buns on top.
-
Serve your piping hot, crispy smash burgers immediately!
-
You Must Know: Secrets to Smash Burger Supreme Success
Mastering the smash burger isn’t just a recipe; it’s a technique and an understanding of key principles that elevate it above ordinary burgers.
-
80/20 Chuck is Non-Negotiable: This specific fat-to-lean ratio is the secret weapon. The fat renders quickly on the hot griddle, creating steam that cooks the meat rapidly while simultaneously lubricating the surface for the Maillard reaction. Leaner beef will be dry and tough. Do not use lean ground beef!
-
Loosely Formed Beef Balls: Handle the ground beef as little as humanly possible. Overworking the meat develops gluten, making the patties tough. Just gently roll them into balls, don’t compact them.
-
Screaming Hot Griddle (The Maillard Reaction): This is the foundation of the smash burger. The intense, direct heat is what creates that dark, crispy, flavorful crust through the Maillard reaction (the browning of amino acids and sugars). If your griddle isn’t hot enough, you’ll steam the burger, not smash it.
-
Smash Immediately and Only Once: Place the beef ball on the hottest part of the griddle. Immediately cover it with parchment paper and press down firmly and quickly with your spatula or press for 5-10 seconds. This creates maximum surface contact. Do NOT smash it again. Do NOT press out the juices after the initial smash.
-
Parchment Paper is Your Friend: Always use a small square of parchment paper between your spatula/press and the beef ball. This prevents the patty from sticking to your tool and ensures a clean lift after smashing.
-
Season ONLY After Smashing: Apply salt and pepper generously to the top of the smashed patty immediately after smashing. Seasoning too early (before smashing) can draw out moisture, leading to drier burgers.
-
Scrape, Don’t Lift (The Crust): When flipping, use a sturdy metal spatula and scrape firmly underneath the patty to release that beautiful crust. Don’t be gentle; you want to get all that caramelized goodness.
-
American Cheese Reigns Supreme: For smash burgers, American cheese is the gold standard. Its unique emulsifiers melt quickly and evenly into a smooth, gooey blanket that perfectly coats the thin patty without breaking or becoming oily.
-
Toast Your Buns: This is often overlooked but crucial. A properly toasted bun provides structural integrity (no soggy bottom!), adds flavor, and creates a pleasing textural contrast. Buttering the buns beforehand adds even more flavor.
-
Speed and Freshness: Smash burgers cook incredibly fast. Have all your toppings, sauces, and toasted buns ready to go for immediate assembly and serving. A hot smash burger waits for no one!
-
Internal Doneness: Due to their thinness, smash burgers cook rapidly to the USDA recommended 160°F (71°C) for ground beef. You won’t see much pink, but they remain juicy due to the quick cook and fat content.
Topping Variations
While a classic smash burger with American cheese is pure perfection, the beauty of homemade allows for endless creative topping combinations.
-
Classic Enhancements:
-
Caramelized Onions: Slow-cooked onions until deeply sweet and brown add incredible depth. Cook them on a cooler part of the griddle while your burgers cook.
-
Sautéed Mushrooms: Earthy, savory mushrooms (cooked on the griddle) pair wonderfully with beef.
-
Crispy Bacon: Crumbled crispy bacon is always a welcome addition for texture and salty flavor.
-
Fried Egg: A runny fried egg takes it to a breakfast-for-dinner level.
-
-
Spicy Kicks:
-
Diced Jalapeños: Fresh or pickled, for a burst of heat.
-
Chipotle Aioli: Mix mayo with adobo sauce from canned chipotles for a smoky, creamy, spicy sauce.
-
Pepper Jack Cheese: For a melty cheese with a spicy kick.
-
Hot Sauce: A few dashes of your favorite hot sauce.
-
-
Tangy & Fresh:
-
Red Onion Rings (thinly sliced): For a sharp, fresh bite.
-
Bread & Butter Pickles: A sweeter, tangier pickle option.
-
Fresh Arugula: For a peppery, fresh green.
-
Guacamole or Sliced Avocado: For creamy richness and freshness.
-
-
Gourmet Touches:
-
Blue Cheese Crumbles: For a pungent, savory punch.
-
Balsamic Glaze: A drizzle over the patty or caramelized onions.
-
Sun-Dried Tomato Pesto: A thin smear on the bun.
-
Pickled Red Onions: For a tangy, slightly sweet, and vibrant crunch.
-
-
Sauce Swaps:
-
BBQ Sauce: Sweet and smoky.
-
Ranch Dressing: Creamy and herbaceous.
-
Garlic Aioli: Rich and flavorful.
-
“Oklahoma Onion Burger” Style: Thinly sliced white onion is pressed directly into the patty during the smash, cooking with the meat.
-
Make It A Meal: Pairing Your Smash Burgers
Smash burgers are a complete and satisfying meal, but they shine even brighter with the right companions.
-
Classic American Sides:
-
Crispy French Fries or Onion Rings: The quintessential burger accompaniment. Cook them on the griddle too if you have space!
-
Coleslaw: A cool, creamy, or tangy coleslaw offers a refreshing contrast.
-
Potato Salad: A hearty, comforting side.
-
Sweet Potato Fries: For a sweeter, earthy alternative to regular fries.
-
-
Griddle-Friendly Sides:
-
Griddle-Cooked Asparagus or Zucchini: Quickly cooked veggies seasoned with salt, pepper, and garlic powder.
-
Grilled Corn on the Cob (Elote): A fantastic, flavorful side that can be made right on the griddle.
-
Blackstone Loaded Potato Chips: The ultimate indulgent side, combining homemade griddle chips with cheese and bacon.
-
-
Light & Fresh Options:
-
Simple Green Salad: A basic mixed green salad with a light vinaigrette to cut through the richness.
-
Watermelon or Fruit Salad: A refreshing option, especially on a hot day.
-
-
Beverage Pairings:
-
Cold Beer: A crisp lager, IPA, or even a craft stout can pair well.
-
Classic Sodas: Coca-Cola, Root Beer, or Cream Soda for that retro diner feel.
-
Milkshakes: The ultimate diner pairing – thick, creamy milkshakes in chocolate, vanilla, or strawberry.
-
Iced Tea or Lemonade: Refreshing non-alcoholic options.
-
Pro Tips for Blackstone Smash Burger Mastery
To truly elevate your smash burger game beyond the basics, consider these expert tips and advanced techniques.
-
Pre-Chill Your Beef Balls (Optional): While counterintuitive to “loosely formed,” some chefs find that chilling the loosely formed beef balls for 15-20 minutes before smashing helps them hold their shape better during transport to the griddle, without compacting them.
-
Dedicated Smash Spatula: Invest in a sturdy, thin, metal spatula with a wide, flat blade (often called a griddle spatula or scraper). This is essential for getting a good smash and for scraping up that crispy crust.
-
Utilize Different Griddle Zones: If your Blackstone has multiple burners, use the hottest zone for the initial smash and sear. A slightly cooler zone can be used for toasting buns or finishing thicker toppings like caramelized onions.
-
The Onion Smash (Oklahoma Style): For an authentic “Oklahoma Onion Burger,” very thinly slice white onion. Place a handful of onion slices directly on top of the beef ball before smashing. Pressing the onion into the hot griddle with the beef adds incredible flavor and texture.
-
Basting with Butter/Beef Fat: In the last 30 seconds of cooking, after the cheese is on, you can add a small pat of butter to the gr griddle near the burger. Use your spatula to baste the melting butter over the patty and bun for extra richness and flavor.
-
The “Double Cheese” Smash: For extra cheesy goodness, after flipping and adding the first slice of cheese, place a second patty (that has just been cooked on its first side) directly on top of the first cheesy patty. Then immediately add another slice of cheese on top of the second patty. This creates a glorious double-stacked, double-cheesy burger.
-
Homemade Special Sauce: Don’t underestimate the power of a good homemade burger sauce. It can tie all the flavors together and add a signature touch. Experiment with ratios of mayo, ketchup, relish, hot sauce, and spices.
-
Season Your Griddle: A well-seasoned griddle surface is naturally more non-stick, which helps immensely with achieving that clean crust separation when flipping. Ensure your Blackstone is properly seasoned and maintained.
-
Don’t Overcook: Smash burgers are thin, so they cook very quickly. Overcooking will make them dry and tough. The beauty is in the speed and the thinness. Trust your timing and visual cues.
-
Serve Immediately on Hot Buns: The experience of a smash burger is all about that contrast between the hot, crispy patty and the soft, warm bun. Don’t let them sit around; assemble and serve right off the griddle!
Recipe FAQs
Q: Why is 80/20 ground chuck so important?
A: The 20% fat content is crucial. On the hot griddle, the fat quickly renders, creating a flavorful steaming effect that helps cook the thin patty rapidly while the lean meat sears. This ensures a juicy interior despite the thinness and promotes the formation of that desirable crispy crust. Leaner beef would dry out and become tough.
Q: My patties are sticking to the griddle. What am I doing wrong?
A: Common culprits for sticking:
* Griddle not hot enough.
* Not enough oil on the griddle surface.
* Trying to flip too early before a crust has fully formed.
* Not using a sturdy, thin metal spatula to scrape firmly under the patty.
* Griddle surface not properly seasoned.
Q: Do I really need to use parchment paper for smashing?
A: Yes, it’s highly recommended. It prevents the raw beef from sticking to your spatula or press, ensuring a clean release and a beautifully formed patty. Without it, you’ll have a messy cleanup and potentially miss out on that full, flat smash.
Q: Can I season the beef before forming the balls?
A: It’s best to season after smashing. Pre-seasoning the beef before forming the balls and smashing can draw out moisture, potentially leading to drier burgers. Seasoning the top of the raw, smashed patty ensures the salt and pepper adhere directly to the meat for maximum flavor during searing.
Q: What if I don’t have a burger press?
A: A sturdy, flat metal spatula will work perfectly. You might need to use a second, smaller spatula or even the bottom of a heavy pot to press down on the main spatula to get enough leverage for a good smash.
Q: How thin should I smash the patties?
A: Aim for about 1/4 inch thick, or even 1/8 inch. The thinner, the crispier the edges will be. Don’t be afraid to make them very thin!
Q: Can I make these ahead of time?
A: You can prep the beef into loose balls and keep them refrigerated for a few hours. You can also prep all your toppings and sauces. However, the actual smashing and cooking of the burgers should be done fresh, just before serving, for the best results and crispest texture.
Q: How do I prevent the buns from getting soggy?
A: Two key steps:
* Toast them properly until golden brown and firm.
* Serve immediately after assembly.
* For extremely juicy burgers, you can place a small piece of lettuce or a thin slice of tomato on the bottom bun as a barrier.
Q: What’s the best way to get the cheese perfectly melted?
A: Place the cheese on immediately after flipping the patty. The residual heat from the cooked patty, combined with the heat from the griddle, will melt it. Using a metal dome or lid for the last 30-60 seconds (with a tiny splash of water for steam) can also ensure a beautiful, gooey melt.
Q: Can I make smash burgers in a regular skillet?
A: Yes, absolutely! A heavy-bottomed cast iron skillet is the best choice for stovetop smash burgers, as it retains heat well and provides a large, flat searing surface. Follow all the same principles.
