Introduction
Get ready to transform a beloved Eastern European classic into a Blackstone griddle sensation! These Blackstone Cabbage Pierogies take the comforting flavors of tender cabbage and sweet caramelized onions, nestled inside soft pierogi dough, and then perfectly crisp them on the hot griddle. Whether you’re making pierogies from scratch or elevating store-bought versions, the Blackstone delivers that irresistible golden-brown crust and a beautiful caramelization that oven-baked or boiled pierogies just can’t match. It’s a fun, flavorful, and incredibly satisfying way to enjoy these delicious dumplings.
Yields: Approximately 30-40 pierogies (if making from scratch)
Prep time: 45 minutes – 1 hour (for dough & filling)
Cook time: 20-30 minutes (on griddle)
Ingredients
For the Pierogi Dough (if making from scratch):
-
2 cups all-purpose flour (plus more for dusting): The base of our dough.
-
½ teaspoon salt
-
1 large egg
-
½ cup sour cream
-
¼ cup unsalted butter, melted and cooled
For the Cabbage Filling:
-
1 tablespoon olive oil (or butter): For sautéing.
-
½ head green cabbage (about 1.5 lbs), thinly sliced or shredded: The star of the filling.
-
1 large yellow onion, thinly sliced: For caramelization and sweetness.
-
1 teaspoon caraway seeds (optional but recommended): Adds a traditional, earthy flavor.
-
½ teaspoon salt (or to taste)
-
¼ teaspoon black pepper (or to taste)
-
Pinch of sugar (optional): Helps with cabbage caramelization.
For Griddling & Serving:
-
2-3 tablespoons unsalted butter (or butter/oil mix): For cooking the pierogies on the Blackstone.
-
Optional for serving:
-
Sour cream
-
Fresh dill, chopped
-
Crispy bacon bits
-
Sautéed extra onions
-
Equipment You’ll Need
-
Large mixing bowl (for dough)
-
Rolling pin
-
3-inch round cutter (or a clean, empty tuna can)
-
Large skillet or Dutch oven (for filling)
-
Blackstone Griddle: The star!
-
Spatula or griddle flipper
How To Make Blackstone Cabbage Pierogies
Step 1: Make the Cabbage Filling (Can be done ahead!)
-
Sauté aromatics: Heat 1 tablespoon olive oil (or butter) in a large skillet or Dutch oven over medium heat. Add the thinly sliced onion and cook for 8-10 minutes until softened and starting to caramelize.
-
Add cabbage: Add the shredded cabbage to the skillet. Season with salt, pepper, caraway seeds (if using), and a pinch of sugar (if desired).
-
Cook cabbage: Cook for 15-20 minutes, stirring occasionally, until the cabbage is very tender and has softened significantly. It should be cooked down and slightly caramelized. Taste and adjust seasoning.
-
Cool: Transfer the cabbage filling to a bowl and let it cool completely. This is crucial for easy pierogi assembly.
Step 2: Make the Pierogi Dough (if from scratch)
-
Combine wet ingredients: In a large bowl, whisk together the egg, sour cream, and cooled melted butter.
-
Add dry ingredients: In a separate bowl, combine the flour and salt. Gradually add the dry ingredients to the wet ingredients, mixing with a wooden spoon or your hands until a shaggy dough forms.
-
Knead: Turn the dough out onto a lightly floured surface. Knead for 5-7 minutes until the dough is smooth, elastic, and no longer sticky. Add minimal flour if needed to prevent sticking.
-
Rest: Form the dough into a ball, cover it with plastic wrap or a clean kitchen towel, and let it rest at room temperature for at least 30 minutes. This allows the gluten to relax, making it easier to roll.
Step 3: Assemble the Pierogies (if from scratch)
-
Roll out dough: Divide the rested dough into two equal portions. On a lightly floured surface, roll one portion of the dough very thinly, about 1/16 to 1/8 inch thick.
-
Cut circles: Use a 3-inch round cutter to cut out circles of dough. Gather the scraps, gently re-roll, and cut more circles.
-
Fill and seal:
-
Place about 1-1½ teaspoons of the cooled cabbage filling in the center of each dough circle.
-
Lightly moisten the edge of half the dough circle with a little water using your fingertip.
-
Fold the dough over the filling to form a half-moon.
-
Press the edges firmly to seal, crimping with a fork if desired to create a decorative edge and ensure a tight seal.
-
-
Repeat: Place assembled pierogies on a lightly floured baking sheet and continue until all dough and filling are used.
Step 4: Par-Boil the Pierogies (if from scratch)
-
Boil water: Bring a large pot of salted water to a rolling boil.
-
Cook pierogies: Gently drop 5-6 pierogies into the boiling water (don’t overcrowd the pot). Cook for 2-3 minutes, or until they float to the surface.
-
Remove: Using a slotted spoon, carefully remove the pierogies and place them on a clean plate or wire rack to dry slightly.
-
Note: If using store-bought pierogies, boil them according to package directions until they float, then drain and proceed to the griddle step.
-
Step 5: Griddle the Pierogies on the Blackstone
-
Preheat Blackstone: Preheat your Blackstone Griddle to medium heat.
-
Add butter: Add 2-3 tablespoons of butter (or butter/oil mix) to the griddle.
-
Cook pierogies: Once the butter is melted and sizzling, carefully place the par-boiled (or store-bought boiled) pierogies onto the hot griddle. Do not overcrowd.
-
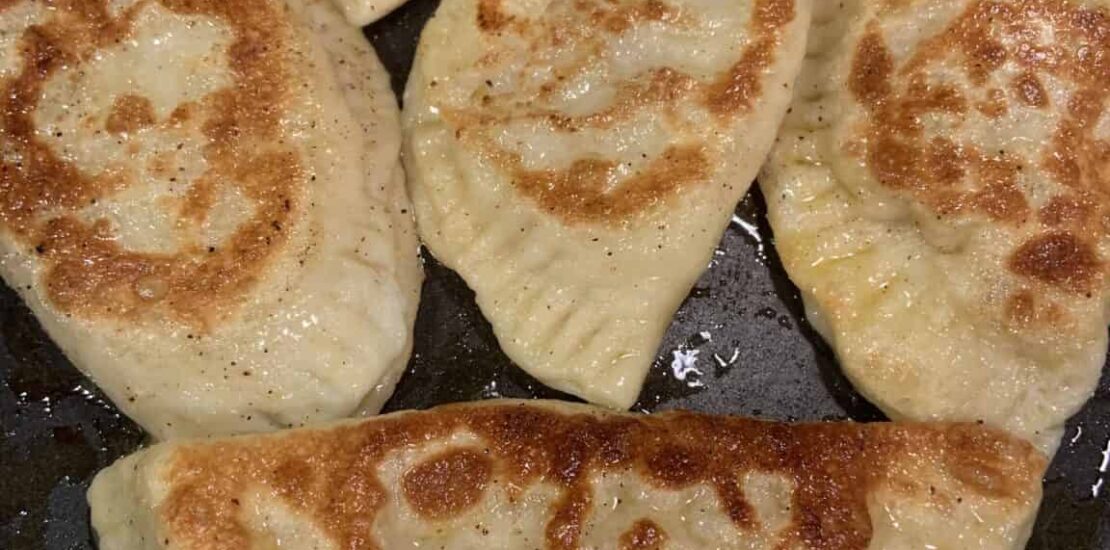
Griddle until golden: Cook for 3-5 minutes per side, or until both sides are deeply golden brown and beautifully crispy.
-
Serve: Remove the griddled pierogies from the Blackstone and serve immediately with a dollop of sour cream, fresh dill, or extra sautéed onions.
You Must Know
-
Cool the Filling: Absolutely essential! Hot filling will make the dough sticky, tear, and be difficult to work with.
-
Thin Dough is Best: Roll the pierogi dough as thin as you can manage without it tearing. Thinner dough results in a more delicate pierogi and a better filling-to-dough ratio.
-
Seal Tightly: Ensure the pierogi edges are sealed very tightly. Any gaps will cause the filling to leak out during boiling or griddling.
-
Par-Boiling is Important (for homemade): This step cooks the dough through before it hits the griddle, ensuring a tender interior while the griddle provides the crispy exterior.
-
Don’t Overcrowd the Griddle: Cook in batches. Overcrowding lowers the griddle temperature, leading to steamed (not crispy) pierogies.
-
Butter is Flavor: Don’t be shy with the butter on the griddle! It contributes immensely to the golden-brown crust and rich flavor.
-
Medium Heat: Ensure your Blackstone is at medium heat. Too low, and they won’t get crispy. Too high, and they’ll burn before they get fully golden.
-
Store-Bought Option: Using pre-made pierogies significantly cuts down on prep time. Just boil them according to package directions, then transfer them to the Blackstone.
Topping Variations
While cabbage pierogies are often served simply, these additions enhance the experience:
-
Classic Sour Cream: A cool, tangy dollop is essential.
-
Crispy Bacon Bits: For a salty, smoky crunch.
-
Caramelized Onions: Cook extra sliced onions until deeply golden and sweet to serve alongside or on top.
-
Fresh Herbs: Chopped fresh dill or parsley adds brightness.
-
Fried Shallots: For a delicate, crispy onion flavor.
-
Brown Butter Sauce: Melt butter and cook until it turns a nutty brown, then drizzle over the pierogies.
-
Sautéed Mushrooms: Earthy and savory, they pair well with cabbage.
Make It A Meal
Cabbage Pierogies, especially when griddled, are hearty enough to be the star of a meal.
-
Protein Side: Serve with grilled kielbasa or other smoked sausage, cooked and sliced on the Blackstone.
-
Green Salad: A light, fresh green salad with a sharp vinaigrette helps to cut through the richness.
-
Roasted Vegetables: Simple roasted root vegetables like carrots or parsnips.
-
Soup: A clear broth soup or a borscht would complement the Eastern European theme.
-
Pickles: A side of traditional dill pickles or sauerkraut for a tangy contrast.
Pro Tips
-
Make Filling Ahead: The cabbage filling can be made 1-2 days in advance and stored in the refrigerator. This is a great time-saver.
-
Dough Resting is Key: Don’t skip the dough resting time. It makes the dough much easier to roll out thinly.
-
Keep Dough Covered: While working, keep any unrolled dough covered with plastic wrap or a damp towel to prevent it from drying out.
-
Flour Your Surfaces: Use just enough flour to prevent sticking when rolling and cutting, but don’t over-flour, as it can make the dough tough.
-
Freeze Extras: Pierogies freeze beautifully! Lay assembled (but uncooked) pierogies in a single layer on a floured baking sheet and freeze until solid. Transfer to freezer bags. Cook from frozen by dropping into boiling water until they float, then griddle.
-
Griddle Hot Spots: Learn your Blackstone’s hot spots. You might need to rotate pierogies or adjust heat zones for even browning.
-
Butter-Oil Mix: Using a mix of butter and a high-smoke-point oil (like canola) can prevent the butter from burning too quickly while still imparting its flavor.
Recipe FAQs
Q: Can I use store-bought pierogies?
A: Absolutely! This recipe is fantastic for elevating store-bought pierogies. Just boil them according to package directions (until they float), drain well, then transfer them to the buttered Blackstone griddle for that amazing crispy finish.
Q: Why do my pierogies fall apart when boiling?
A: This usually means the edges weren’t sealed tightly enough. Ensure you press firmly and crimp the edges well before boiling.
Q: My pierogi dough is too stiff/dry.
A: This could be due to adding too much flour during mixing or kneading, or not letting the dough rest long enough. If it’s too dry, you can try kneading in a tiny bit more sour cream or water, a teaspoon at a time.
Q: How do I get a really crispy crust on the Blackstone?
A:
1. Proper Griddle Temp: Ensure your Blackstone is at a consistent medium heat.
2. Enough Fat: Use enough butter or butter/oil mix.
3. Don’t Overcrowd: Give the pierogies space.
4. Patience: Let them cook undisturbed for a few minutes per side to develop that crust.
Q: Can I make other fillings for pierogies on the Blackstone?
A: Yes! The griddling technique works wonderfully for potato and cheese pierogies, meat pierogies, or even fruit pierogies (though fruit pierogies are less common to griddle).
Q: What if I don’t have a round cutter?
A: You can use the rim of a drinking glass, a clean empty tuna can, or even a jar lid as a cutter.
Q: How do I store leftover pierogies?
A: Store cooked and cooled pierogies in an airtight container in the refrigerator for up to 3-4 days. Reheat them on the Blackstone again for best results, or in a pan, until crispy and warmed through.


