Introduction
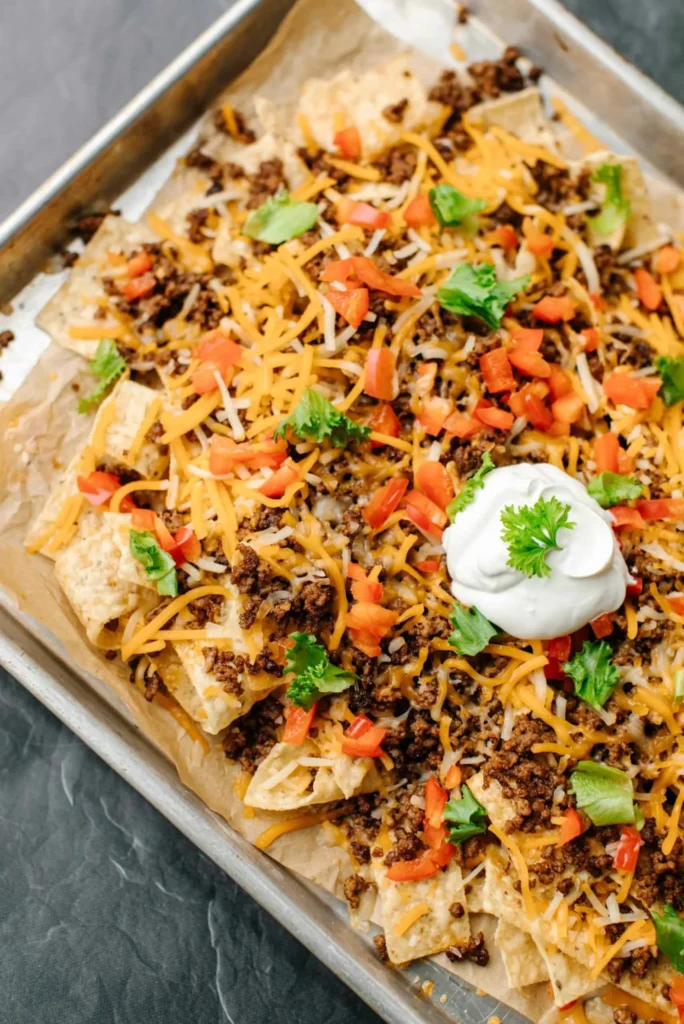
Forget soggy oven-baked nachos and say hello to the ultimate outdoor appetizer: Blackstone Griddle Grilled Nachos! This method is a game-changer, delivering perfectly crispy chips, evenly melted cheese, and beautifully integrated toppings, all cooked directly on the griddle. The magic of the Blackstone lies in its expansive, even heat, allowing you to build and melt a massive pan of nachos with ease, ensuring every chip is covered in cheesy, savory goodness. Perfect for game day, a backyard party, or just a fun family meal, these griddle nachos are a crowd-plepleaser that promises maximum flavor and minimal fuss.
Ingredients
For the Nachos:
-
1 large bag (10-12 ounces) sturdy tortilla chips: Avoid thin, delicate chips that will break easily. Restaurant-style or thicker chips work best.
-
2 cups shredded Monterey Jack cheese (or a Mexican blend): Good melting cheese is crucial.
-
1 cup shredded cheddar cheese: Adds flavor and color.
-
½ pound cooked ground beef or shredded chicken (seasoned): See “Optional Toppings” for details.
-
1 cup black beans, rinsed and drained: Adds protein and earthy flavor.
-
½ cup corn kernels (fresh, frozen, or canned, drained): For sweetness and color.
-
¼ cup pickled jalapeño slices (plus more for serving): Essential for that tangy kick.
-
¼ cup diced red onion: For a sharp, fresh bite.
Optional Toppings (for after grilling):
-
Salsa or Pico de Gallo: Fresh and vibrant.
-
Guacamole or Sliced Avocado: Creamy and rich.
-
Sour cream or Mexican crema: Cool and tangy.
-
Fresh cilantro, chopped: For freshness and color.
-
Extra pickled jalapeños: For spice lovers.
-
Hot sauce: For an extra kick.
For Seasoning Meat (if cooking from scratch):
-
1 tablespoon olive oil
-
1 pound ground beef or chicken
-
1 packet taco seasoning (or your own blend of chili powder, cumin, garlic powder, onion powder, salt, pepper)
-
¼ cup water
Equipment You’ll Need
-
Blackstone Griddle: The star of the show!
-
Aluminum foil pan (half or full size, depending on griddle size and desired nacho quantity): Disposable for easy cleanup.
-
Spatula or metal scraper: For moving toppings and serving.
-
Tongs (optional): For placing toppings.
-
Griddle thermometer (optional): For precise temperature control.
How To Make Blackstone Griddle Grilled Nachos
Step 1: Prepare Your Toppings
-
Cook and season meat (if using):
-
Heat 1 tablespoon olive oil on a section of your Blackstone griddle over medium heat.
-
Add ground beef or chicken and cook, breaking it up with a spatula, until browned. Drain any excess grease.
-
Stir in taco seasoning and ¼ cup of water. Simmer for 2-3 minutes until the water is absorbed and the meat is well-seasoned.
-
Keep warm on a low heat zone or set aside if not using immediately.
-
-
Prepare other toppings: Rinse and drain black beans. If using fresh corn, you can quickly char it on the griddle for a few minutes for extra flavor, then set aside. Dice red onion, chop cilantro, and prepare any other desired cold toppings.
Step 2: Build the Nachos on the Griddle
-
Preheat the Griddle: Set your Blackstone griddle to medium-low heat. You want enough heat to melt the cheese but not burn the chips.
-
Prepare Foil Pan: Take a large aluminum foil pan (e.g., a half-size steam table pan) and place it directly on the griddle. This creates a contained area for your nachos and ensures even melting.
-
Layer the Chips: Spread about half of your tortilla chips in a single layer in the bottom of the foil pan.
-
First Layer of Cheese and Toppings: Sprinkle half of the shredded Monterey Jack and cheddar cheese over the chips. Then evenly distribute half of your cooked meat (if using), black beans, corn, and pickled jalapeños.
-
Second Layer: Repeat the layering process with the remaining chips, cheese, meat, black beans, corn, and jalapeños. Ensure all chips have some toppings.
Step 3: Grill and Melt
-
Cover to Melt: To create a “dome” effect and melt the cheese quickly and evenly, place a larger aluminum foil pan (inverted) over the top of your nacho pan. Alternatively, you can use a metal basting dome.
-
Melt the Cheese: Let the nachos cook on the griddle for 8-12 minutes. The exact time will depend on your griddle’s heat and how loaded your nachos are. Keep an eye on them! You want the cheese to be completely melted and gooey, and the chips warmed through.
-
Tip: Lift the top foil pan or dome occasionally to check on the progress. If the bottom chips are starting to get too dark, reduce the heat.
-
-
Remove from Griddle: Once the cheese is fully melted and bubbly, carefully remove the top pan/dome. Turn off the griddle heat.
Step 4: Add Cold Toppings and Serve
-
Add Fresh Toppings: Carefully transfer the entire foil pan of nachos off the griddle and onto a heat-safe surface. Now is the time to add your fresh, cold toppings: dollops of sour cream, generous spoonfuls of pico de gallo or salsa, scoops of guacamole, and a sprinkle of fresh cilantro.
-
Serve Immediately: Grab forks, tongs, or even spatulas and dig in while the nachos are hot and gooey!
You Must Know
-
Sturdy Chips are Essential: Thin, flimsy chips will break under the weight of the toppings and turn soggy quickly. Choose restaurant-style or thicker, well-fried tortilla chips.
-
Aluminum Foil Pan is Your Friend: It makes building and containing the nachos easy, helps with even melting, and (most importantly) makes cleanup a breeze! Use a sturdy, disposable one.
-
Layering is Key: Don’t just dump all the toppings on top. Layering the chips, cheese, and other components ensures every bite gets a good mix of flavor and every chip gets melted cheese.
-
Low to Medium-Low Heat: You want enough heat to melt the cheese and warm the toppings, but not so much that the bottom chips burn before the top is melted. Be patient and keep an eye on the heat.
-
Covering is Crucial for Melting: An inverted foil pan or a basting dome creates a steamy environment that melts the cheese faster and more evenly, resulting in those perfect gooey strands.
-
Warm Meat Toppings: If using cooked meat, make sure it’s warmed through before layering. This helps the overall nachos heat up faster and contributes to the cheese melting.
-
Don’t Overload: While tempting, don’t pile the toppings too high. This makes it harder for the cheese to melt evenly and can make the nachos difficult to eat.
-
Add Cold Toppings AFTER Grilling: Fresh salsa, guacamole, and sour cream are best added after the nachos come off the griddle. The heat would cook them and change their texture.
Topping Variations (Pre-Griddle)
Get creative with your grilled nacho fillings!
-
Meats:
-
Pulled Pork: Smoked or slow-cooked pulled pork, tossed in a little BBQ sauce.
-
Shredded Chicken: Slow-cooked and seasoned chicken, or rotisserie chicken.
-
Carne Asada: Grilled and thinly sliced marinated steak.
-
Al Pastor: Marinated pork, thinly sliced.
-
Chorizo: Cooked and crumbled.
-
-
Cheeses:
-
Pepper Jack: For a spicier kick.
-
Cotija: Crumbled and sprinkled on for a salty, tangy finish (can be added after grilling too).
-
White Queso: A homemade or store-bought queso could be drizzled on at the end for ultimate creaminess.
-
-
Veggies:
-
Diced Bell Peppers: Any color, sautéed slightly.
-
Sautéed Onions: Beyond red onion, caramelized yellow onions.
-
Roasted Poblanos: For a smoky, mild pepper flavor.
-
Black Olives: Sliced.
-
Scallions: Chopped (some can go pre-griddle, some post-griddle for freshness).
-
Make It A Meal
While often an appetizer, Blackstone Griddle Grilled Nachos are hearty enough to be the star of the show.
-
Fiesta Night: Serve with margaritas or Mexican sodas for a complete backyard fiesta.
-
Game Day Feast: A central component of any game day spread, alongside wings, sliders, and other finger foods.
-
Casual Dinner: A perfect fun dinner for the family. No need for side dishes with a fully loaded nacho pan!
-
Dessert Pairing: Follow up with something light and sweet like churros, fried ice cream, or a fruit salad to balance the savory richness.
-
Protein Boost: Ensure your nachos have plenty of protein (meat, beans) to make them a truly filling meal.
Pro Tips
-
Pre-Warm the Foil Pan: Place the empty foil pan on the griddle for a minute or two before adding chips. This helps distribute heat and gets things melting faster.
-
Use a Dome for Even Melting: Seriously, this is a game-changer. Whether it’s an inverted foil pan, a metal basting dome, or even a large metal bowl, covering creates steam and trapped heat for perfect cheese melt.
-
Monitor the Bottom: The chips directly on the griddle (via the foil pan) can brown quickly. Keep an eye on them. If they start to get too dark, reduce the heat or move the pan to a cooler zone on your griddle.
-
Work in Zones: If your griddle has different heat zones, cook your meat on a hotter zone, then move it to a cooler zone to stay warm while you build and melt the nachos.
-
Have Toppings Ready: Prep all your cold toppings (salsa, guacamole, sour cream, cilantro) and have them ready to go once the nachos come off the griddle. They’re best served immediately.
-
“Deconstructed” Nachos: For a fun presentation, you can grill the chips and cheese in the foil pan, and serve all the other toppings (meat, beans, corn, fresh salsa, guacamole) in separate bowls on the side, allowing everyone to customize their own.
-
Crispy Meat: If you want your meat topping extra crispy, you can spread it thinly on a hot section of the griddle for a few minutes before adding to the nachos.
-
Clean Up Hack: After removing the nachos, while the griddle is still warm, squirt some water on it and scrape clean with your griddle scraper.
Recipe FAQs
Q: Can I use different cheeses for the nachos?
A: Absolutely! Any good melting cheese will work. Monterey Jack, cheddar, Colby, Pepper Jack, or a “Mexican blend” are all excellent choices. A combination often yields the best flavor and melt.
Q: How do I prevent the chips from getting soggy?
A:
1. Use sturdy chips.
2. Don’t overload the pan with too many wet toppings.
3. Ensure the griddle heat is not too low (which would steam rather than toast the chips) and not too high (which would burn them).
4. Add cold, wet toppings (salsa, sour cream, guacamole) after the nachos come off the griddle.
5. Serve immediately.
Q: My cheese isn’t melting evenly. What’s wrong?
A: This usually indicates uneven heat or not enough trapped heat. Ensure your griddle has preheated evenly. Most importantly, make sure you are covering the nachos with a dome or inverted foil pan to trap the heat and steam, which is essential for even melting.
Q: Can I make these vegetarian?
A: Yes! Simply omit the ground beef or chicken. You can add extra black beans, corn, or even some sautéed bell peppers and onions to bulk up the vegetarian version.
Q: How do I keep the meat warm while the nachos melt?
A: If your Blackstone has multiple burners, cook the meat on a hotter zone, then reduce the heat on that zone to low or move the meat to a warmer section of the griddle (not directly over high heat) while you build and melt the nachos.
Q: What size foil pan should I use?
A: This depends on the size of your griddle and how many nachos you want. A half-size steam table pan (usually about 10×12 inches) fits well on most 28-inch Blackstones, and a full-size pan (about 12×20 inches) is great for larger griddles or bigger crowds.
Q: Can I put the sour cream and guacamole on before grilling?
A: It’s strongly recommended to add sour cream, guacamole, and fresh salsa after grilling. The heat will cause them to curdle, become watery, or change texture, which isn’t ideal for nachos.
Q: How do I know when the nachos are done?
A: The cheese should be fully melted and bubbly, and the chips should be warmed through. You can lift a few chips from the bottom with a spatula to check if they’re nicely toasted but not burnt.