Introduction
The English Muffin, a breakfast icon, is a masterpiece of texture and flavor that stands apart from its bread cousins. Its signature characteristic? Those craggy, dimpled surfaces – the “nooks and crannies” – that are just begging to be toasted to a golden crisp and then slathered with butter, jam, or even become the foundation for a glorious Eggs Benedict. Unlike standard bread, English Muffins are typically cooked on a griddle, not baked in an oven, giving them a unique chewy texture with a subtle tang from the yeast. Making them from scratch is incredibly rewarding and surprisingly straightforward, yielding a batch far superior to anything store-bought.
Ingredients
For the Muffins:
-
1 cup warm milk (105-115°F / 40-46°C): Whole milk is preferred for richness.
-
1 tablespoon granulated sugar: Feeds the yeast and adds a touch of sweetness.
-
2 ¼ teaspoons active dry yeast (one standard packet): The leavening agent.
-
3 cups all-purpose flour (plus more for dusting): The base of our dough.
-
1 teaspoon salt: Essential for flavor and controlling yeast activity.
-
2 tablespoons unsalted butter, melted and cooled: Adds richness and tenderness.
-
Cornmeal (for dusting): Crucial for preventing sticking and adding a characteristic texture to the outside of the muffins.
Equipment You’ll Need
-
Large mixing bowl
-
Whisk
-
Spatula or wooden spoon
-
Clean kitchen towel
-
Rolling pin
-
3-inch round cutter (or a clean, empty tuna can with both ends removed)
-
Baking sheet
-
Large griddle or cast-iron skillet
How To Make English Muffins
Step 1: Activate the Yeast
-
Combine warm milk and sugar: In a large mixing bowl, pour the warm milk. Stir in the granulated sugar until dissolved.
-
Add yeast: Sprinkle the active dry yeast over the surface of the milk. Let it sit for 5-10 minutes. The yeast should bloom, forming a foamy layer on top, indicating it’s active. If it doesn’t foam, your yeast may be old or your milk not the right temperature, and you should start again.
Step 2: Prepare the Dough
-
Add dry ingredients: To the yeast mixture, add 1 cup of the all-purpose flour and the salt. Stir with a wooden spoon or spatula until just combined.
-
Add melted butter: Pour in the cooled melted butter and stir it into the mixture.
-
Gradually add remaining flour: Gradually add the remaining 2 cups of flour, about ½ cup at a time, mixing until a shaggy dough forms. You may not need all of the flour, or you might need a tiny bit more – the dough should be soft, slightly sticky, but manageable.
-
Knead the dough: Turn the dough out onto a lightly floured surface. Knead for 6-8 minutes, until the dough is smooth and elastic. It should still be a bit tacky but not sticky enough to cling to your hands.
Step 3: First Rise (Bulk Fermentation)
-
Prepare for rising: Lightly grease the mixing bowl you used earlier (or a clean one) with a little oil. Place the dough ball in the bowl, turning it once to coat all sides.
-
Rise: Cover the bowl with plastic wrap or a clean kitchen towel. Let the dough rise in a warm, draft-free place for 1 to 1 ½ hours, or until it has doubled in size.
Step 4: Shape the Muffins
-
Punch down and roll out: Gently punch down the risen dough to release the air. Turn it out onto a lightly floured surface. Use a rolling pin to roll the dough to about ½-inch thickness.
-
Cut the muffins: Lightly dust a baking sheet with cornmeal. Using a 3-inch round cutter (or tuna can), cut out circles of dough. Reroll the scraps gently and cut out more muffins until all the dough is used.
-
Place on cornmeal: Carefully transfer the cut muffins to the prepared cornmeal-dusted baking sheet, leaving some space between them. Lightly dust the tops of the muffins with a little more cornmeal.
Step 5: Second Rise (Proofing)
-
Rise again: Loosely cover the baking sheet with plastic wrap or a clean kitchen towel. Let the muffins rise in a warm, draft-free place for another 30-45 minutes, or until they look puffy and slightly increased in size.
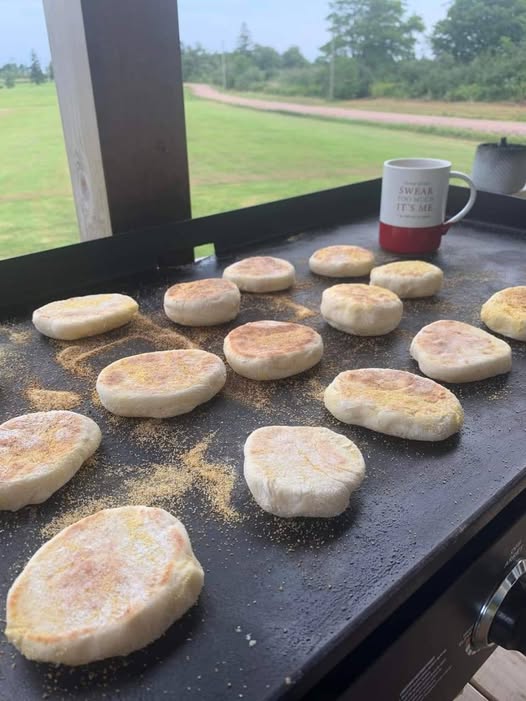
Step 6: Cook the English Muffins
-
Preheat griddle: Heat a large griddle or a heavy-bottomed skillet (like cast iron) over medium-low heat. It’s crucial for the heat to be low and even. Too high, and they’ll burn before cooking through.
-
Cook muffins: Carefully place the proofed English muffins on the preheated griddle. Cook for 5-8 minutes per side, or until they are deeply golden brown on both sides and cooked through in the center. The cooking time will vary depending on your griddle and heat.
-
Tip: If they are browning too quickly, reduce the heat. If they are not browning enough, slightly increase it. You want them to cook slowly enough for the interior to cook and the “nooks and crannies” to develop.
-
-
Check for doneness: To ensure they are cooked through, you can gently press on the center – they should feel firm. Alternatively, you can sacrifice one muffin, slice it in half, and check for any raw dough (though this is less common with proper cooking).
-
Cool: Transfer the cooked English Muffins to a wire rack to cool completely.
Step 7: Serve
-
Fork split: Once cooled, use a fork to split the English Muffins in half horizontally (don’t slice with a knife, as this will destroy the nooks and crannies).
-
Toast and enjoy: Toast them lightly in a toaster or under a broiler until golden and crispy. Slather with butter, jam, honey, or use as a base for your favorite breakfast sandwich or Eggs Benedict.
You Must Know
-
“Nooks and Crannies” are Key: The unique, porous texture of English Muffins is their defining characteristic. This is achieved by using a relatively sticky dough, a slow rise, and cooking on a griddle rather than baking.
-
Fork Splitting, Not Cutting: Never use a knife to split an English Muffin! Using a fork to prick around the circumference and then gently pull it apart creates that signature craggy interior, maximizing the surface area for butter and jam.
-
Proper Dough Consistency: The dough should be soft and slightly sticky, but not so sticky that it’s unmanageable. Resist the urge to add too much flour during kneading, as this will result in dry, tough muffins.
-
Patience with Yeast: Allow the yeast to bloom properly and the dough to rise fully. Rushing these steps will impact the texture and flavor.
-
Low and Slow Griddle Cooking: This is crucial. English Muffins need to cook slowly over medium-low heat to ensure they cook through without burning the exterior. If your griddle is too hot, they will brown too quickly and remain doughy inside.
-
Cornmeal is Essential: Don’t skip the cornmeal dusting! It prevents sticking, adds a subtle texture, and is traditional for English Muffins.
-
Even Heat Distribution: If using a skillet, ensure it’s a heavy-bottomed one (like cast iron) that distributes heat evenly. This prevents hot spots that can lead to uneven browning.
-
Don’t Overcrowd the Griddle: Cook in batches if necessary, giving the muffins enough space to cook evenly and for you to flip them easily.
Topping Variations
The beauty of English Muffins lies in their versatility. While butter and jam are classic, here are some other delicious ways to enjoy them:
-
Sweet Toppings:
-
Nutella or other chocolate spreads: For a decadent treat.
-
Peanut butter or almond butter with sliced bananas: A filling and nutritious option.
-
Honey or maple syrup: Simple and sweet.
-
Cream cheese and fruit: Plain or flavored cream cheese with berries or fruit compote.
-
Lemon curd: For a bright, tangy twist.
-
-
Savory Toppings (turning them into a meal):
-
Eggs Benedict: The quintessential use! Poached egg, Canadian bacon, and hollandaise sauce.
-
Breakfast Sandwiches: Toasted muffin, fried egg, cheese, and your choice of bacon, sausage patty, or ham.
-
Avocado Toast (Muffin style): Smashed avocado, everything bagel seasoning, chili flakes, and a squeeze of lime.
-
Mini Pizzas: Spread with tomato sauce, sprinkle with mozzarella and your favorite pizza toppings, then broil until cheese is melted and bubbly.
-
Open-faced Tuna Melt: Toasted muffin, tuna salad, slice of cheese, then broiled until cheese is melted.
-
Smoked Salmon: Cream cheese, smoked salmon, capers, and fresh dill.
-
Make It A Meal
English Muffins are a fantastic base for a complete breakfast, brunch, or even a light lunch.
-
Classic Breakfast: Serve freshly toasted English Muffins alongside scrambled eggs, crispy bacon, and a side of fresh fruit or hash browns.
-
Brunch Spread: Feature English Muffins with various spreads (jams, butter, honey, cream cheese), a platter of sliced cheeses and cured meats, and a selection of fresh fruit.
-
Eggs Benedict Bar: Set out all the components for Eggs Benedict (poached eggs, Canadian bacon/ham, hollandaise) and let guests assemble their own.
-
Breakfast Sandwiches: A grab-and-go option, perfect for busy mornings. Make a batch of breakfast sandwiches ahead of time and freeze them for quick reheating.
-
Soup and Sandwich: Pair a savory English Muffin creation (like a tuna melt or mini pizza) with a cup of tomato soup or a light vegetable soup for lunch.
-
Dessert Alternative: Use toasted English Muffins as a base for a fruit cobbler, splitting and toasting them, then topping with warm fruit and a dollop of ice cream.
Pro Tips
-
Don’t Over-Flour: The dough should remain relatively soft and slightly tacky after kneading. Too much flour will result in dense, dry muffins with fewer nooks and crannies.
-
The Power of Warmth: Ensure your milk is the correct temperature for activating yeast. A warm, draft-free spot (like a slightly warm oven that’s been turned off, or near a sunny window) is ideal for rising dough.
-
Grease Your Bowl Lightly: A thin layer of oil prevents the dough from sticking during its first rise.
-
Rethink Your Cutter: If you don’t have a 3-inch round cutter, a clean, empty tuna can (with both ends removed) works perfectly. You can also form the dough into a log and slice thick rounds, then gently flatten them.
-
No Peek During Grilling (Initially): Let the muffins cook undisturbed for several minutes per side to allow that golden crust to form. Constant lifting and peeking will interfere with browning.
-
Check Internal Temperature (Advanced): For absolute certainty of doneness without sacrificing a muffin, a probe thermometer inserted into the center should read around 200-210°F (93-99°C).
-
Storage: Once cooled, English Muffins can be stored in an airtight container at room temperature for 2-3 days, or in the refrigerator for up to a week.
-
Freezing: They freeze exceptionally well! Place cooled muffins in a freezer-safe bag or container for up to 2-3 months. Thaw at room temperature and then fork-split and toast.
-
Make a Double Batch: English Muffins are such a labor of love that it’s always worth making a double batch to enjoy fresh and then freeze the rest for later.
Recipe FAQs
Q: Why are my English Muffins dense and not airy?
A: This could be due to several reasons:
* Inactive yeast: Ensure your yeast foams up properly in the warm milk.
* Too much flour: Over-flouring during kneading or initial mixing can make the dough stiff.
* Insufficient rising: The dough and cut muffins need to double in size during their respective rises.
* Not enough liquid: Ensure accurate measurement of milk.
Q: Can I use instant yeast instead of active dry yeast?
A: Yes, you can. If using instant yeast, you can mix it directly with the flour and salt (skip the blooming step in warm milk) or still bloom it for reassurance. The amount typically remains the same (2 ¼ teaspoons).
Q: My English Muffins are browning too quickly on the griddle.
A: Your griddle heat is too high. Reduce the heat to medium-low. English Muffins need to cook slowly to allow the interior to cook through without burning the exterior.
Q: How do I get more “nooks and crannies”?
A: The key factors are:
* Soft, slightly sticky dough: Don’t add too much flour.
* Proper rising times: Allows the yeast to create air pockets.
* Fork splitting: This is crucial for exposing the irregular interior.
Q: Can I make these dairy-free?
A: Yes, you can substitute the milk with a non-dairy milk (like almond or soy) and the butter with a dairy-free butter alternative or neutral oil.
Q: What if I don’t have a round cutter?
A: A clean, empty tuna can (with both ends removed) works perfectly as a 3-inch cutter. You can also form the dough into a thick log, slice 1/2-inch thick rounds, and then gently flatten them.
Q: Why do my English Muffins stick to the griddle?
A: Ensure your griddle is lightly greased (if not naturally non-stick) and that you’ve dusted the bottom of the muffins generously with cornmeal. Also, the griddle might not be hot enough initially, causing sticking before a crust forms.
Q: Can I bake English Muffins in the oven?
A: While you can, they won’t have the same classic texture and “nooks and crannies” as griddle-cooked ones. Baking them will result in a more bread-like consistency. The griddle cooking method is what defines the English Muffin