Introduction
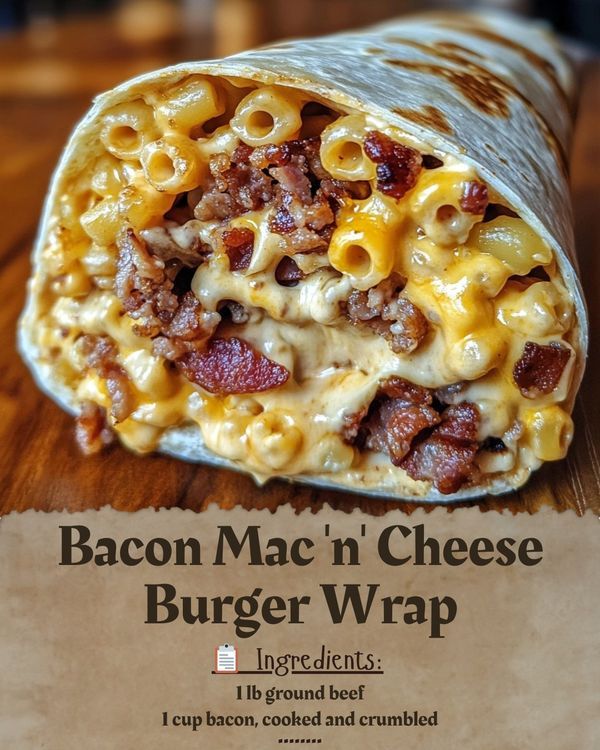
In the realm of comfort food, few things hit the spot quite like a juicy bacon cheeseburger. But what if you could take all those beloved flavors – the savory patty, crispy bacon, melted cheese, and fresh toppings – and bundle them into a convenient, handheld, and utterly satisfying wrap? Enter the Ultimate Bacon Cheese Burger Wrap: a culinary innovation that combines the best of a burger with the ease of a wrap. It’s less messy than a traditional burger, perfect for on-the-go enjoyment, and surprisingly versatile. Forget the bun; this wrap delivers all the classic burger experience, amplified, making it destined to become your new favorite go-to comfort meal.
Ingredients
Creating the ultimate Bacon Cheese Burger Wrap starts with high-quality ingredients. Each component plays a crucial role in building layers of flavor and texture that truly elevate this dish.
For the Burger Patties:
-
1 ½ lbs Ground Beef (80/20 Chuck): This fat-to-lean ratio is crucial for a juicy, flavorful burger.
-
1 teaspoon Garlic Powder: Adds an aromatic depth.
-
1 teaspoon Onion Powder: Enhances the savory profile.
-
½ teaspoon Smoked Paprika: A subtle smokiness that complements the bacon.
-
½ teaspoon Black Pepper: Freshly ground is always best.
-
1 teaspoon Salt: Essential for seasoning the meat properly.
For the Crispy Bacon:
-
8-12 slices Thick-Cut Bacon: Thick-cut bacon holds up better in the wrap and provides a satisfying chew and crunch. You can use less if preferred.
For the Melted Cheese:
-
8 slices American Cheese: Melts beautifully and provides that classic burger cheesiness. Cheddar, Monterey Jack, or a blend can also be used for variety.
For the Tortillas:
-
6-8 large (10-12 inch) Flour Tortillas: The foundation of your wrap. Choose large, pliable tortillas that won’t tear easily. Wheat tortillas can also be a good option.
For the Classic Burger Toppings (Prepared & Ready):
-
1 cup Shredded Iceberg or Romaine Lettuce: Provides a crisp, fresh contrast.
-
1 large Tomato, thinly sliced and quartered: For freshness and a touch of acidity.
-
½ Red Onion, thinly sliced: Adds a sharp, pungent kick.
-
4-6 Dill Pickle Spears, quartered lengthwise or sliced into rounds: Essential for that tangy crunch.
For the Ultimate Burger Sauce:
-
½ cup Mayonnaise: The creamy base.
-
3 tablespoons Ketchup: For sweetness and tang.
-
2 tablespoons Yellow Mustard: Adds a piquant edge.
-
1 tablespoon Sweet Relish (or finely minced dill pickle): For texture and a burst of flavor.
-
1 teaspoon White Vinegar or Apple Cider Vinegar: Brightens the sauce.
-
½ teaspoon Garlic Powder: Echoes the burger seasoning.
-
Pinch of Smoked Paprika: Ties into the burger and bacon flavors.
-
PPinch of Cayenne Pepper (optional): For a subtle kick.
Optional Extras (for assembly and garnish):
-
Sriracha or Hot Sauce: For extra heat.
-
Fresh Jalapeños, sliced: If you love a spicy kick.
-
Avocado, sliced or mashed: For creaminess and healthy fats.
-
Chives or Green Onions, chopped: For a fresh, oniony garnish.
How To Make the Ultimate Bacon Cheese Burger Wrap
The process for assembling these wraps is straightforward but requires a logical flow to ensure everything is cooked perfectly and comes together seamlessly.
Step 1: Prepare Your Bacon
-
Oven Method (Recommended for crispness and even cooking): Preheat your oven to 400°F (200°C). Lay the bacon slices in a single layer on a baking sheet lined with parchment paper or foil. Bake for 15-20 minutes, or until desired crispness is achieved. Drain on paper towels and set aside. Once cooled slightly, you can break them into smaller pieces for easier distribution in the wrap.
-
Stovetop Method: Cook bacon in a large skillet over medium heat until crispy. Drain excess fat and set aside on paper towels.
Step 2: Form and Cook the Burger Patties
-
In a large bowl, gently combine the ground beef with garlic powder, onion powder, smoked paprika, salt, and black pepper. Avoid overworking the meat, as this can lead to tough burgers.
-
Divide the mixture into 6-8 equal portions (depending on how many wraps you’re making and your desired patty size). Form each portion into a thin patty, slightly wider than your tortilla to account for shrinkage during cooking. Make a slight indentation in the center of each patty to prevent it from bulging.
-
Heat a large skillet or griddle over medium-high heat. Add a tablespoon of oil if not using a non-stick surface.
-
Cook the patties for 3-4 minutes per side for medium doneness, or adjust to your preference. During the last minute of cooking, place a slice of American cheese on top of each patty. Cover the skillet briefly (if possible) or place a lid over the patties to help the cheese melt quickly and evenly. Once melted, remove the cheeseburger patties from the skillet and set aside.
Step 3: Make the Ultimate Burger Sauce
-
In a small bowl, whisk together mayonnaise, ketchup, yellow mustard, sweet relish (or minced pickle), white vinegar, garlic powder, and a pinch of smoked paprika. Add cayenne pepper if desired. Taste and adjust seasonings as needed. This sauce is a game-changer!
Step 4: Warm the Tortillas
-
Warming tortillas makes them more pliable and less likely to crack when folding. You can do this in several ways:
-
Microwave: Stack tortillas and microwave for 15-30 seconds until warm and soft.
-
Dry Skillet: Heat a dry skillet over medium heat. Place one tortilla at a time for 15-20 seconds per side, until warm and slightly puffed.
-
Griddle/Blackstone: If your griddle is still warm from the burgers, quickly warm the tortillas on it for a few seconds per side.
-
Step 5: Assemble the Wraps
-
Lay a warm tortilla flat on a clean surface.
-
Spread the Sauce: Spoon a generous amount (about 1-2 tablespoons) of the Ultimate Burger Sauce onto the center of the tortilla, leaving a border around the edges.
-
Add the Patty: Place one cheesy burger patty on top of the sauce.
-
Layer the Bacon: Arrange 1-2 slices of crispy bacon (or pieces) over the patty.
-
Add Fresh Toppings: Pile on a good amount of shredded lettuce, a few tomato slices, some red onion, and dill pickle pieces.
-
Fold the Wrap:
-
Fold the bottom edge of the tortilla up and over the filling, tucking it in snugly.
-
Fold in both side edges towards the center, overlapping slightly.
-
Starting from the bottom, tightly roll the wrap upwards until it’s fully enclosed and secure. The goal is a compact, tight cylinder.
-
Step 6: Optional Griddle Finish (Highly Recommended!)
-
For an extra layer of texture and to help seal the wrap, lightly butter or oil a clean section of your skillet or griddle.
-
Place the assembled wraps seam-side down on the hot surface. Cook for 1-2 minutes per side, or until golden brown and slightly crispy. This step not only adds flavor but also helps the wrap hold its shape.
Step 7: Serve and Enjoy!
-
Slice the wraps in half diagonally for an impressive presentation and easier eating. Serve immediately with extra burger sauce for dipping, if desired.
You Must Know
While the process is relatively simple, mastering the Ultimate Bacon Cheese Burger Wrap involves a few key insights that can elevate your creation from good to absolutely phenomenal.
-
Don’t Overwork the Meat: When mixing your ground beef with seasonings, use a light hand. Overworking the meat compacts it, leading to a tough, dense burger patty rather than a tender, juicy one. Gently combine until just mixed.
-
Season Liberally and Layer Flavors: Don’t be shy with salt and pepper on your patties. The seasonings in the beef, the smokiness of the bacon, and the tang of the sauce all build on each other. Each component should taste good on its own to make the final wrap exceptional.
-
The Patty Thickness Matters: Aim for thinner patties than you might for a traditional bun-burger. Thinner patties cook faster, fit better into a wrap, and ensure you get a good meat-to-topping ratio in every bite without the wrap becoming too bulky to fold.
-
Crispy Bacon is Non-Negotiable: Soggy bacon is the enemy of this wrap. Achieving truly crispy bacon, whether in the oven or skillet, is crucial for adding that essential textural contrast. Let it drain well on paper towels to remove excess grease.
-
Warm Tortillas are Key for Folding: This cannot be stressed enough. Cold tortillas will crack and tear when you try to fold them. Warming them makes them pliable and prevents frustrating assembly mishaps.
-
The Art of the Roll: Practice makes perfect with wrap rolling. Start by tucking the bottom edge tightly, then fold in the sides, and finally roll up firmly. A tight roll keeps all those delicious fillings secure and prevents them from falling out. If your wrap is loose, it will be messy and less enjoyable.
-
The Griddle Finish is a Game Changer: While optional, taking an extra couple of minutes to griddle-press your assembled wraps seam-side down adds a fantastic golden-brown crust, helps seal the wrap, and slightly warms all the internal ingredients, bringing everything together harmoniously. It’s worth the extra step for both taste and structural integrity.
-
Mind the Moisture: While juicy is good, excessive moisture can make your wrap soggy. Ensure your tomatoes are well-drained, and don’t overload with sauce. If using very wet toppings, consider adding them last or sparingly.
Topping Variations
One of the beauties of the Bacon Cheese Burger Wrap is its adaptability. While the classic combination is superb, don’t hesitate to experiment with different toppings and flavor profiles.
-
Spicy Kick:
-
Jalapeño Popper Wrap: Add sliced fresh or pickled jalapeños, a dollop of cream cheese, and a sprinkle of crispy fried onions.
-
Sriracha Mayo: Mix Sriracha into your burger sauce for an extra fiery kick.
-
Pepper Jack Cheese: Swap American cheese for Pepper Jack.
-
-
BBQ Lover’s Delight:
-
BBQ Sauce: Drizzle your favorite smoky BBQ sauce over the patty.
-
Caramelized Onions: Slow-cook onions until sweet and deeply browned.
-
Crispy Fried Onions: For added texture and flavor.
-
-
Mushroom & Swiss:
-
Sautéed Mushrooms: Cooked mushrooms add an earthy, umami depth.
-
Swiss Cheese: Melts beautifully and pairs well with mushrooms.
-
-
Avocado Ranch:
-
Sliced Avocado: Creamy, healthy fats.
-
Ranch Dressing: Swap the burger sauce for a creamy ranch, perhaps even an avocado ranch.
-
-
Breakfast Burger Wrap:
-
Fried Egg: Add a perfectly cooked fried egg (runny yolk optional!)
-
Breakfast Sausage Patty: Replace some or all of the beef with a breakfast sausage patty.
-
Hash Browns: A small amount of crispy hash browns can add a fun breakfast twist.
-
-
Mediterranean Twist:
-
Feta Cheese: Crumbled feta for a salty tang.
-
Red Bell Pepper & Cucumber: Finely diced for freshness.
-
Tzatziki or Hummus: As a spread instead of burger sauce.
-
-
Tex-Mex Style:
-
Salsa & Guacamole: Top with fresh salsa and creamy guacamole.
-
Corn & Black Bean Salsa: For a chunky, flavorful addition.
-
Chipotle Mayo: For smoky heat.
-
Make It A Meal
While the Ultimate Bacon Cheese Burger Wrap is a substantial meal on its own, pairing it with the right sides can transform it into a truly satisfying feast.
-
Classic Comfort Sides:
-
French Fries or Onion Rings: You can’t go wrong with this timeless pairing. Sweet potato fries are also a great option.
-
Coleslaw: A refreshing, creamy coleslaw cuts through the richness of the wrap.
-
Potato Salad: A hearty, traditional side that complements burgers perfectly.
-
Tater Tots: For a fun, nostalgic touch.
-
-
Lighter & Fresher Options:
-
Side Salad: A simple green salad with a vinaigrette dressing offers a fresh counterpoint.
-
Fruit Salad: A light and sweet option to balance the savory wrap.
-
Vegetable Sticks with Dip: Carrots, celery, bell peppers with ranch or hummus.
-
-
Beverage Pairings:
-
Milkshake: The ultimate burger companion! Vanilla, chocolate, or strawberry.
-
Iced Tea or Lemonade: Refreshing and cuts through richness.
-
Craft Beer: A cold lager or a pale ale pairs wonderfully with a savory burger.
-
Soda: A classic choice for many.
-
Pro Tips
Take your Ultimate Bacon Cheese Burger Wrap from excellent to extraordinary with these expert tips and tricks.
-
Smash Burger Technique for Patties: For extra crispy edges on your burger patties, try the “smash burger” technique. Form loose balls of ground beef, place them on a very hot griddle/skillet, and use a sturdy spatula to smash them thin and flat against the hot surface immediately. Cook quickly, flip, add cheese, and remove. This creates maximum surface area for a delicious crust.
-
Make Ahead Components: To streamline assembly, prepare your bacon and burger sauce in advance. You can even form the burger patties ahead of time and store them in the fridge between layers of parchment paper. This makes weeknight dinner a breeze.
-
Toast Your Tortillas Post-Assembly: As mentioned in the main instructions, griddling the assembled wrap seam-side down for a couple of minutes per side is a pro move. It creates a satisfying crispy exterior, helps seal the wrap, and warms all the fillings together. Don’t skip this if you have time!
-
Control Your Topping Distribution: When placing toppings, think about balance. Don’t just dump them in the middle. Try to distribute them evenly across the length of where the roll will be, ensuring every bite gets a good mix of flavors and textures.
-
Use a Large Cutting Board for Assembly: Give yourself plenty of space when assembling the wraps. A large, clean cutting board or a clean counter space will make the process much smoother.
-
Customize Your Cheese: While American cheese is classic for its melt, don’t be afraid to use sharp cheddar, Monterey Jack, provolone, or even a blend of shredded cheeses. The key is to get it nicely melted onto the patty.
-
Consider a “Sauce Barrier”: If you’re concerned about your wrap getting soggy, spread a thin layer of cheese (even just a dusting of shredded cheese) or the burger sauce directly onto the tortilla before adding the wet toppings like tomato or pickles. This can act as a slight barrier.
-
Serve Immediately: These wraps are best enjoyed fresh off the griddle while the cheese is still melty, the bacon is crisp, and the tortilla is warm.
Recipe FAQs
Here are some common questions you might have when making your Ultimate Bacon Cheese Burger Wraps:
Q: Can I use ground turkey or chicken instead of ground beef?
A: Absolutely! While the flavor profile will change, you can definitely adapt this recipe. Be sure to use ground turkey or chicken with a higher fat content (e.g., 93/7 or 90/10) to prevent the patties from becoming too dry. Adjust cooking times as poultry needs to be cooked through.
Q: How do I prevent my tortillas from tearing?
A: The most important tip is to warm your tortillas before assembling. This makes them pliable. Also, use large (10-12 inch) flour tortillas, and don’t overfill them. When folding, be firm but gentle.
Q: Can I make these ahead of time?
A: You can prep many of the components ahead: cook the bacon, make the burger sauce, and chop the vegetables. Cooked burger patties can be stored in the fridge for 2-3 days. However, for the best quality, assemble and griddle-press the wraps just before serving. If you need to make them an hour or so in advance, you can keep them warm (and prevent sogginess) by placing them on a baking sheet in a warm oven (around 200°F/95°C).
Q: What if I don’t have a griddle for the final press?
A: A regular skillet or even a panini press will work perfectly! You just need a hot, flat surface to get that golden, crispy exterior.
Q: My burger patties are falling apart. What am I doing wrong?
A: This usually happens if the ground beef mixture is not properly chilled, has too low a fat content, or if the patties are too thick. Ensure your meat is cold when forming patties, use an 80/20 ratio, and don’t overhandle the meat. Making a slight indentation in the center can also help them hold their shape.
Q: Can I use different types of cheese?
A: Yes! While American cheese is classic for its melt and flavor, feel free to experiment. Cheddar, Monterey Jack, provolone, Swiss, or even a blend of shredded cheeses can be used. Just ensure they melt well.
Q: Is there a vegetarian option for this wrap?
A: Definitely! You can swap the beef patty for a high-quality vegetarian burger patty (store-bought or homemade) and use plant-based bacon alternatives. Ensure all your sauces and toppings are vegetarian-friendly.