Introduction
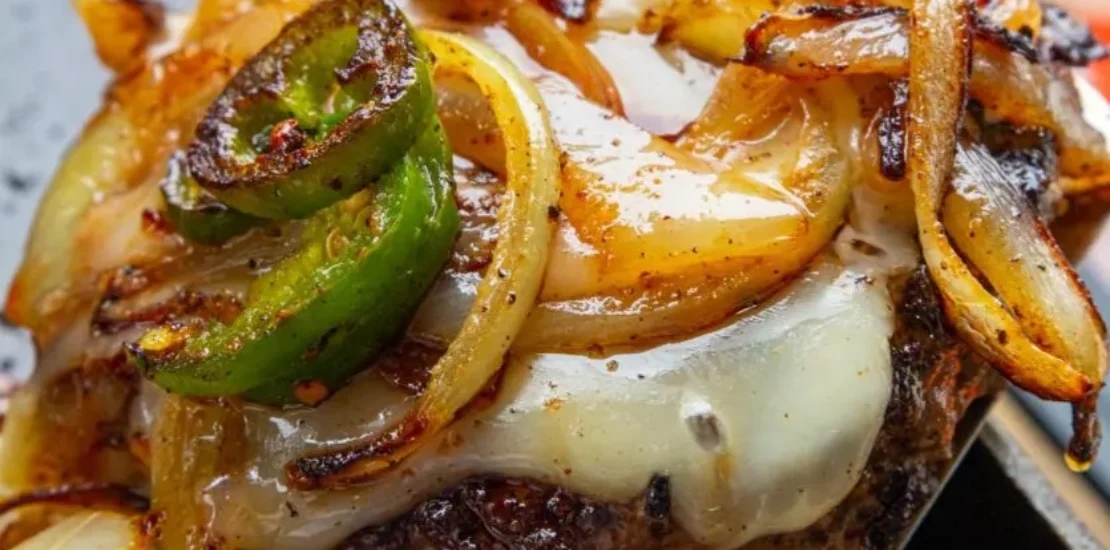
Forget everything you thought you knew about making burgers at home. The smash burger technique, perfected on a flat top like the Blackstone Griddle, is a revelation. This method guarantees an intensely flavorful, deeply caramelized crust (the “Maillard reaction” at its finest), a thin, crispy edge, and an unbelievably juicy interior, all achieved in mere minutes. We’re talking crispy edges, gooey melted cheese, and tender, well-seasoned beef that comes together faster than you can say “extra pickles.” If you want to experience the pinnacle of homemade burgers, this is it.
Yields: 4 burgers
Prep time: 10 minutes
Cook time: 5-8 minutes
Ingredients
For the Burgers:
-
1 pound ground beef (80/20 Chuck blend is ideal): This fat content is crucial for juiciness and flavor.
-
4 slices American cheese: Melts perfectly and is traditional for smash burgers. Cheddar or Provolone also work.
-
4 hamburger buns: Potato buns or brioche buns are great. Toasting them is essential!
-
1 small yellow onion, very thinly sliced or finely diced (optional): For cooking into the patty or as a fresh topping.
-
Dill pickle slices: A must for that tangy crunch.
-
Favorite burger condiments: Ketchup, mustard, mayonnaise, special sauce.
-
Salt (fine sea salt or kosher salt is best): Generous seasoning is key.
-
Freshly ground black pepper: To taste.
-
1-2 tablespoons neutral oil (like vegetable or canola): For a lightly greased griddle.
Equipment You’ll Need
-
Blackstone Griddle: The star of the show!
-
Heavy, sturdy spatula (metal is best) with a flat bottom for smashing
-
Griddle scraper
-
Sheet pan or plate for prepared ingredients
-
Small bowl (for special sauce, if making)
How To Make Ultra Juicy Smash Burgers On The Blackstone Griddle
Step 1: Prep Your Ingredients
-
Prepare beef: Divide the ground beef into 4 equal portions (each about ¼ pound). Gently form them into very loose, rustic balls – do NOT pack them tightly. Place them on a plate.
-
Prepare buns: Split the hamburger buns. Have them ready for toasting.
-
Prepare toppings: Slice cheese, onions (if using), and have pickles and condiments ready. Time moves fast once the smashing starts!
-
Seasoning: Have your salt and pepper readily accessible.
Step 2: Preheat and Toast Buns
-
Preheat griddle: Turn your Blackstone Griddle to medium-high to high heat. Allow it to preheat for at least 5-10 minutes until it’s very hot and shimmering.
-
Toast buns: Lightly brush or butter the cut sides of the hamburger buns. Place them face down on a cooler section of the griddle (or briefly on the main cooking zone if it’s not too hot) and toast for 1-2 minutes until golden brown. Remove and set aside.
Step 3: Smash and Cook the Patties
-
Oil griddle: Lightly coat a section of the very hot griddle with a tablespoon of neutral oil.
-
Place beef balls: Place two (or four, if your griddle is large enough) loose beef balls onto the hot oiled griddle, leaving ample space between them.
-
Smash! Immediately place a piece of parchment paper or a square of foil over each beef ball (this prevents sticking to your spatula). Using your sturdy spatula, press down firmly and evenly on each beef ball, smashing it as thin as possible (to about 1/8 to ¼ inch thick). Hold the smash for 5-10 seconds to ensure maximum contact with the griddle.
-
If using thin-sliced onions: You can place a small amount of very thinly sliced or finely diced onion directly on top of the raw beef ball before smashing. This cooks the onions right into the patty.
-
-
Season: Remove the parchment/foil. Generously season the exposed top side of the smashed patties with salt and freshly ground black pepper.
-
Cook first side: Let the patties cook undisturbed for 1.5 – 2 minutes. You’ll see the edges get crispy and brown, and the color will start to change from the bottom up.
-
Scrape and flip: Using your sturdy spatula, aggressively scrape underneath the patty (getting all those crispy bits!) and flip it over.
-
Add cheese: Immediately place a slice of American cheese on top of each flipped patty.
-
Cook second side: Continue cooking for another 45-60 seconds, or until the cheese is beautifully melted and the second side has developed a nice crust.
Step 4: Assemble and Serve
-
Stack patties: Once cooked, stack two cheesy patties on the toasted bottom bun.
-
Add toppings: Add any desired fresh toppings like pickles, lettuce, tomato, or a special sauce.
-
Top and serve: Place the top bun on and serve immediately! Repeat with remaining patties and buns.
You Must Know
-
80/20 Ground Beef is CRUCIAL: The fat content in 80/20 chuck renders out, helping to create the crispy crust and keeping the patty incredibly juicy. Leaner beef will be dry and won’t smash as well.
-
Loose Balls, Not Packed: Do NOT form tight, dense patties initially. Loose balls allow for maximum surface contact with the griddle when smashed, leading to a better crust.
-
Smash IMMEDIATELY: You must smash the beef ball as soon as it hits the hot griddle. If you wait, the meat starts to cook and won’t smash as thin or create as good a crust.
-
SMASH THIN: The thinner, the better! This is how you get those super crispy edges and intense flavor.
-
High Heat is Non-Negotiable: The griddle must be screaming hot to achieve the Maillard reaction (browning/caramelization) that defines a smash burger.
-
Season GENEROUSLY: Don’t be shy with salt and pepper after smashing. It’s critical for flavor.
-
Scrape, Don’t Lift: When flipping, use a sturdy, sharp-edged spatula and scrape under the patty to get all those delicious crispy bits (the “lace”) that stick to the griddle.
-
Toast Your Buns: A toasted bun adds texture and prevents the bun from getting soggy from the juicy patty.
Topping Variations
While a classic smash burger is simple, you can certainly get creative!
-
Classic Additions: Lettuce, tomato, onion (raw thin slices, or griddled), extra pickles.
-
“Secret Sauce”: A mix of mayo, ketchup, mustard, relish, and a dash of hot sauce or Worcestershire.
-
Bacon: Crispy cooked bacon strips.
-
Jalapeños: Fresh or pickled jalapeño slices for a kick.
-
Caramelized Onions: Slow-cooked caramelized onions, added on top of the cheese.
-
Mushrooms: Sautéed mushrooms.
-
Different Cheeses: Pepper Jack for spice, Provolone for a mild melt, or sharp cheddar for tang.
-
Fried Egg: A griddled fried egg on top for a breakfast-style burger.
-
Chili Cheese: A spoonful of warm chili and some extra cheese sauce.
Make It A Meal
Smash burgers are a complete meal in themselves, but here are some classic pairings:
-
French Fries: The quintessential burger companion.
-
Onion Rings: Crispy, golden onion rings.
-
Potato Chips: Simple, satisfying crunch.
-
Coleslaw: A creamy or tangy coleslaw to cut through the richness.
-
Dill Pickles: Always serve extra pickle spears on the side.
-
Milkshake: For the ultimate diner experience.
-
Side Salad: A fresh green salad for a lighter contrast.
Pro Tips
-
Parchment Paper Hack: Using a square of parchment paper between your spatula and the beef ball before smashing prevents the meat from sticking to the spatula and ensures a clean release.
-
Two Spatulas: For the best scrape and flip, sometimes using two spatulas (one to scrape, one to hold) works best, especially if your main smashing spatula isn’t perfectly sharp.
-
Keep Buns Warm: After toasting, you can stack the buns and cover them loosely with foil to keep them warm while you finish cooking the burgers.
-
Batch Cooking: If making many burgers, dedicate a zone of your griddle for cooked patties to stay warm on low heat while you continue smashing and cooking.
-
Clean Griddle Between Batches: For best results, quickly scrape down your griddle with a metal scraper between batches to remove any burnt bits.
-
Don’t Touch After Smashing: Once smashed and seasoned, resist the urge to move the patty until you’re ready to scrape and flip. This allows that amazing crust to form.
-
Practice Makes Perfect: The smashing technique takes a little practice to get just right. Don’t be discouraged if your first few aren’t perfect!
Recipe FAQs
Q: Why do I need 80/20 ground beef? Can I use leaner meat?
A: 80/20 ground chuck has the ideal fat content. The fat renders, helping to fry the meat in its own juices, creating that super crispy, flavorful crust and keeping the thin patty juicy. Leaner meats (like 90/10) will be dry, tough, and won’t get as good a crust.
Q: What if I don’t have a very sturdy spatula for smashing?
A: You need a heavy, flat-bottomed metal spatula. If yours isn’t quite sturdy enough, you can place a second spatula or a small, heavy pot on top of your smashing spatula to apply more pressure.
Q: Can I use different cheeses?
A: American cheese is classic for its incredible melt and creamy texture. However, Monterey Jack, Colby, Provolone, or even a thin slice of mild cheddar will also melt well and taste delicious.
Q: My burgers are sticking to the griddle. What’s wrong?
A:
1. Griddle not hot enough: Ensure it’s very hot before adding the beef.
2. Not enough oil: A thin layer of neutral oil is important.
3. Not scraping aggressively enough: You need to get under that crust.
4. Waiting too long to smash: If you wait, the meat starts to cook and adhere before it’s properly smashed.
Q: How do I get those super crispy edges (the “lace”)?
A: This comes from:
1. Very hot griddle.
2. Smashing the patty as thin as possible.
3. Using 80/20 ground beef.
4. Allowing it to cook undisturbed for 1.5-2 minutes on the first side.
5. Aggressively scraping when flipping to get all the browned bits.
Q: Can I cook these on a regular stovetop cast-iron skillet?
A: Yes, absolutely! Follow the same principles, just adjust the number of patties you cook at once based on your skillet size to avoid overcrowding. You’ll still get fantastic results.
Q: How do I know when the burger is cooked through since it’s so thin?
A: Because they are smashed so thin, they cook very quickly. By the time you get a good crust on both sides and the cheese is melted, they will be cooked through to at least medium-well. If you desire rare, shorten the cooking time slightly after flipping.
Q: What’s the best way to handle the beef without overworking it?
A: Simply divide the pound of beef into 4 equal portions and gently roll them into very loose balls. Do not compress them or knead them. The less you handle it, the more tender the final burger will be.

