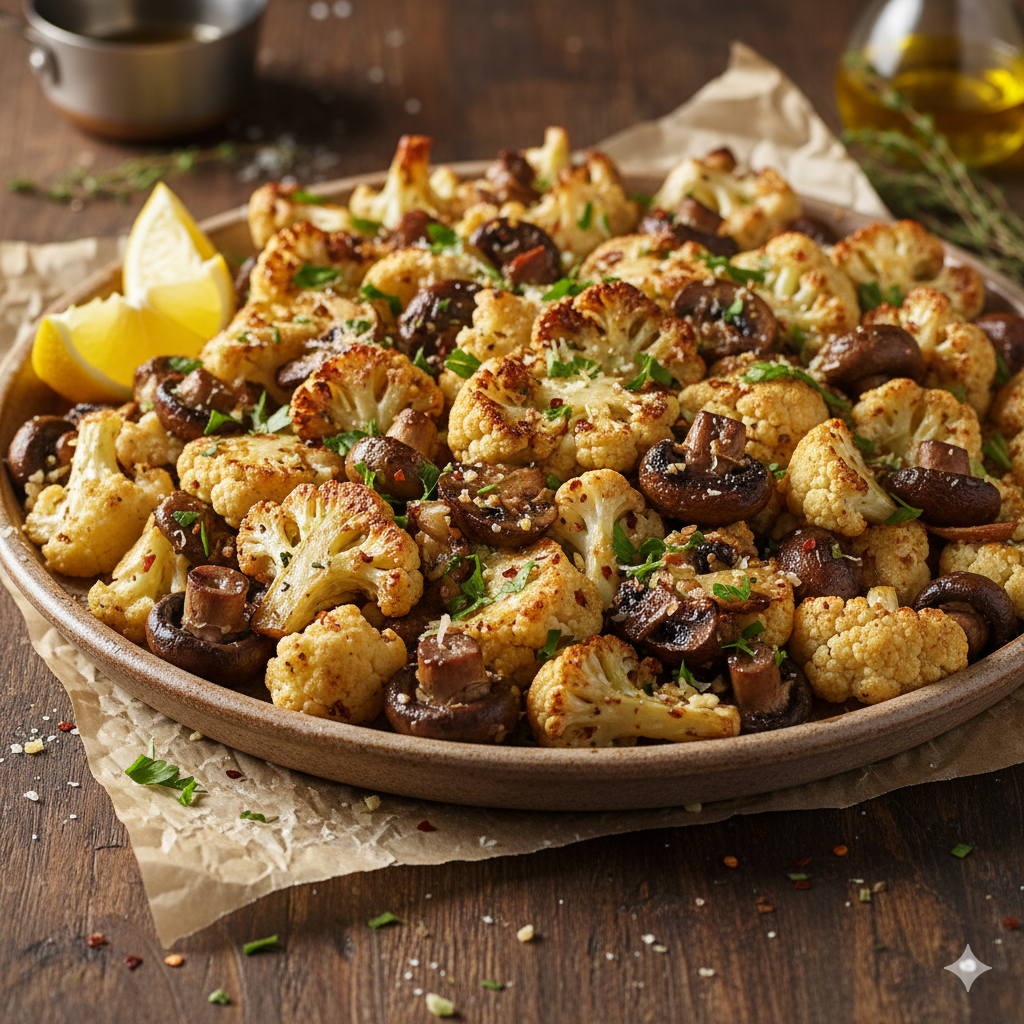
Garlic butter cauliflower and mushrooms is a simple yet incredibly flavorful dish that can elevate any meal. Whether you’re looking for a healthy side, a delicious appetizer, or a versatile component to a larger meal, this recipe delivers on taste and ease. The combination of tender-crisp cauliflower, earthy mushrooms, and the rich aroma of garlic butter creates a harmonious blend that is both comforting and satisfying. This dish is naturally gluten-free and can easily be adapted to be dairy-free or vegan, making it a fantastic option for a variety of dietary needs. Get ready to transform humble vegetables into a culinary delight!
Ingredients
To embark on this delicious journey, gather the following ingredients. Quality ingredients will undoubtedly yield the best results, so opt for fresh produce and good quality butter.
For the Garlic Butter Cauliflower & Mushrooms:
-
1 large head cauliflower (about 2-2.5 lbs): Look for a firm, white head with no brown spots.
-
16 oz cremini mushrooms (baby bella): Choose firm mushrooms, free from sliminess or excessive moisture. You can also use white button mushrooms.
-
4-6 cloves garlic: Fresh garlic is key here. Adjust the amount to your preference – garlic lovers might opt for more!
-
4 tablespoons unsalted butter: If using salted butter, reduce the amount of added salt.
-
2 tablespoons olive oil: Extra virgin olive oil adds a nice flavor.
-
1/2 teaspoon dried thyme (optional): Adds an earthy, aromatic note.
-
1/4 teaspoon black pepper: Freshly ground is always best.
-
1/2 teaspoon salt: Or to taste.
-
2 tablespoons fresh parsley, chopped: For garnish and a burst of freshness.
Optional Additions/Variations:
-
Lemon wedge: For serving, to add a bright, zesty finish.
-
Red pepper flakes: For a touch of heat.
-
Parmesan cheese: For sprinkling at the end.
How To Make Garlic Butter Cauliflower & Mushrooms
This recipe is designed for simplicity and maximum flavor. Follow these steps for a perfect batch every time.
Step 1: Prepare the Cauliflower
-
Wash and dry: Thoroughly wash the head of cauliflower under cold running water. Pat it dry with a clean kitchen towel or paper towels. Excess moisture can lead to steaming instead of roasting, preventing that desirable tender-crisp texture.
-
Core and cut: Carefully remove the tough core from the bottom of the cauliflower. This can be done by cutting around it with a sharp knife.
-
Break into florets: Break or cut the cauliflower into bite-sized florets. Aim for pieces that are roughly uniform in size (about 1 to 1.5 inches) to ensure even cooking. If some florets are much larger than others, they will take longer to cook, while smaller ones might overcook.
-
Set aside: Place the prepared cauliflower florets in a large mixing bowl.
Step 2: Prepare the Mushrooms
-
Clean: Do not rinse mushrooms under running water, as they are like sponges and will absorb too much moisture, leading to a soggy texture when cooked. Instead, gently wipe each mushroom clean with a damp paper towel or a soft brush to remove any dirt.
-
Trim and slice: Trim off the very end of the stems, if they appear dry or dirty. For cremini or white button mushrooms, you can slice them into quarters or halves, depending on their size. If using larger mushrooms, slice them thicker. For smaller ones, you can leave them whole. Aim for pieces roughly similar in size to your cauliflower florets for even cooking.
-
Set aside: Add the prepared mushrooms to the bowl with the cauliflower florets.
Step 3: Prepare the Garlic Butter Mixture
-
Mince garlic: Peel the garlic cloves. Using a sharp knife, finely mince the garlic. Alternatively, you can use a garlic press for convenience.
-
Melt butter: In a small saucepan or microwave-safe bowl, melt the unsalted butter. You can do this gently over low heat on the stovetop or in the microwave in 15-second intervals until just melted. Be careful not to brown the butter at this stage.
-
Combine with oil and seasonings: Once the butter is melted, stir in the olive oil, minced garlic, dried thyme (if using), salt, and black pepper. Mix well to combine all the flavors. This creates a flavorful, aromatic coating for your vegetables.
Step 4: Coat the Vegetables
-
Pour mixture: Pour the prepared garlic butter mixture over the cauliflower and mushrooms in the large mixing bowl.
-
Toss well: Using a large spoon or your hands (you might want to wear gloves), thoroughly toss the vegetables until they are evenly coated with the garlic butter mixture. Ensure every floret and mushroom piece gets a good layer of flavor.
Step 5: Roast the Vegetables
-
Preheat oven: Preheat your oven to 400°F (200°C). This high temperature is crucial for achieving nicely roasted, slightly caramelized vegetables.
-
Prepare baking sheet: Line a large baking sheet with parchment paper. This prevents sticking and makes cleanup a breeze.
-
Spread in single layer: Arrange the coated cauliflower and mushrooms in a single layer on the prepared baking sheet. It’s very important not to overcrowd the pan. If the vegetables are piled on top of each other, they will steam instead of roast, resulting in a soggy texture. If necessary, use two baking sheets to ensure ample space between the vegetables.
-
Roast: Place the baking sheet(s) in the preheated oven. Roast for 20-25 minutes, or until the cauliflower is tender-crisp and slightly caramelized, and the mushrooms are browned and tender.
-
Flip halfway: Halfway through the cooking time (around the 10-12 minute mark), carefully remove the baking sheet from the oven and use a spatula to flip or stir the vegetables. This ensures even browning and cooking on all sides.
-
Check for doneness: Pierce a cauliflower floret with a fork; it should be tender but still have a slight bite. The edges of the cauliflower should be lightly browned, and the mushrooms should be soft and juicy.
Step 6: Finish and Serve
-
Remove from oven: Once cooked to perfection, remove the baking sheet from the oven.
-
Garnish: Transfer the roasted garlic butter cauliflower and mushrooms to a serving dish. Sprinkle generously with fresh chopped parsley.
-
Serve immediately: Serve hot as a delightful side dish. A squeeze of fresh lemon juice just before serving can brighten the flavors beautifully.
You Must Know
While the recipe above provides a straightforward path to deliciousness, understanding a few key principles can elevate your results from good to outstanding.
-
Don’t Overcrowd the Pan: This is perhaps the most critical rule for perfectly roasted vegetables. When vegetables are packed too closely on a baking sheet, they release moisture, which then gets trapped. This creates steam, and instead of caramelizing and getting tender-crisp, they end up soft and soggy. Always ensure there’s enough space around each piece for air to circulate. If you have a large batch, use two baking sheets.
-
High Heat is Your Friend: Roasting at a high temperature (400°F/200°C) is essential for achieving that desirable slightly charred, caramelized exterior and tender interior. Lower temperatures will just cook the vegetables without imparting that rich roasted flavor and texture.
-
Dry Vegetables are Happy Vegetables: Before tossing your cauliflower and mushrooms with the oil and butter, ensure they are as dry as possible. Excess moisture prevents browning and can lead to a steamed texture. Patting them dry with paper towels after washing is a crucial step.
-
Fresh Garlic Makes a Difference: While garlic powder can work in a pinch, fresh minced garlic provides a much more robust, aromatic, and nuanced flavor that truly shines in this dish. It’s worth the extra minute of prep.
-
Uniformity in Size: Cutting your cauliflower florets and mushroom pieces into similar sizes ensures they cook evenly. If you have a mix of very large and very small pieces, some will be overcooked while others are undercooked.
-
Season Generously: Don’t be shy with salt and pepper. Vegetables, especially cauliflower, can absorb a lot of seasoning. Taste and adjust if necessary, especially after roasting. A squeeze of lemon at the end also helps to “wake up” the flavors.
-
Parchment Paper for Easy Cleanup: Lining your baking sheet with parchment paper is a simple trick that saves you from scrubbing later. The roasted vegetables won’t stick, and cleanup is a breeze.
Topping Variations
While delicious on its own, garlic butter cauliflower and mushrooms can be enhanced with a variety of toppings to introduce new textures, flavors, and aromas.
-
Fresh Herbs Galore: Beyond parsley, consider fresh chives, dill, or even a sprinkle of oregano or marjoram for different aromatic profiles. Basil could also work, added at the very end.
-
Citrus Zest & Juice: A final squeeze of fresh lemon juice is highly recommended to brighten the dish. For an extra punch of citrus, grate some lemon zest over the finished vegetables. Lime zest could also provide an interesting twist.
-
Cheese Please!
-
Parmesan or Pecorino Romano: A generous grating of hard, salty cheese over the hot vegetables adds a wonderful umami depth and a hint of sharpness.
-
Feta or Goat Cheese: Crumbled feta or creamy goat cheese can add a tangy, salty, or creamy contrast, especially if you enjoy a more Mediterranean flair.
-
Nutritional Yeast: For a dairy-free option, nutritional yeast can impart a cheesy, umami flavor.
-
-
Spicy Kick: If you like heat, sprinkle red pepper flakes over the vegetables before roasting, or add a dash of cayenne pepper to the butter mixture. A drizzle of your favorite chili oil at the end can also provide a pleasant warmth.
-
Toasted Nuts or Seeds:
-
Toasted Pine Nuts: These add a buttery crunch and Mediterranean touch.
-
Toasted Sliced Almonds: Offer a mild, nutty crunch.
-
Sesame Seeds: Lightly toasted sesame seeds can bring an Asian-inspired aroma and texture.
-
-
Crispy Onions/Shallots: For an extra layer of texture and savory sweetness, crisp-fried shallots or onions can be sprinkled over the top just before serving.
-
Balsamic Glaze: A drizzle of thick, sweet-tart balsamic glaze after roasting can add complexity and a beautiful sheen.
-
Breadcrumbs: Toasted panko breadcrumbs mixed with a little butter and herbs can provide a delightful crunchy topping.
Make It A Meal
While an excellent side dish, garlic butter cauliflower and mushrooms can easily be transformed into a more substantial meal with a few clever additions.
-
Hearty Vegetarian Main:
-
Add Chickpeas or White Beans: Toss a can of drained and rinsed chickpeas or cannellini beans with the cauliflower and mushrooms before roasting. They’ll get slightly crispy and add protein and fiber, making it a complete vegetarian meal.
-
Serve over Grains: Spoon the roasted vegetables over a bed of quinoa, couscous, farro, or brown rice for a fulfilling and nutritious bowl.
-
Pair with Halloumi or Tofu: Cube halloumi cheese or firm tofu, toss it with a little oil and seasonings, and roast alongside the vegetables. Halloumi will get wonderfully golden and squeaky, while tofu will absorb the flavors beautifully.
-
-
With Protein Power-Up:
-
Grilled or Baked Chicken/Fish: Serve the roasted vegetables alongside grilled chicken breast, baked salmon, pan-seared cod, or roasted pork tenderloin. The flavors are versatile enough to complement almost any lean protein.
-
Steak or Lamb: The richness of garlic butter pairs exceptionally well with red meats. Imagine these vegetables accompanying a perfectly seared steak or tender lamb chops.
-
-
In Pasta or Grain Bowls:
-
Pasta Toss: Cook your favorite pasta (linguine, penne, or fusilli work well). Toss the hot pasta with the roasted garlic butter cauliflower and mushrooms, a splash of pasta water, extra olive oil, and plenty of Parmesan cheese for a quick and flavorful pasta dish.
-
Warm Grain Salad: Combine the roasted vegetables with cooked grains, a light vinaigrette, fresh greens, and maybe some sun-dried tomatoes or olives for a warm and satisfying grain bowl.
-
-
As a Warm Salad: Let the roasted vegetables cool slightly, then toss them with fresh arugula or spinach, a sprinkle of feta cheese, and a light lemon-herb vinaigrette for a delightful warm salad.
-
In a Frittata or Omelette: Chop any leftovers and incorporate them into a morning frittata or omelette for a delicious and easy breakfast or brunch.
-
Stirred into Risotto: For an extra layer of flavor and texture, stir some of the roasted cauliflower and mushrooms into a creamy risotto at the end of its cooking.
Pro Tips
These little nuggets of wisdom can make a significant difference in your cooking process and the final outcome of your dish.
-
Don’t Waste the Cauliflower Leaves/Stem: While this recipe focuses on florets, the inner, tender cauliflower leaves and the core can be thinly sliced and roasted along with the florets. They are perfectly edible and delicious, reducing food waste. The very outer, tougher leaves are usually discarded.
-
Infuse the Butter: For an even deeper garlic flavor, you can gently sauté the minced garlic in the melted butter and olive oil for about 30 seconds before tossing with the vegetables. Be careful not to burn the garlic.
-
Season in Layers: While the primary seasoning happens before roasting, consider a final sprinkle of flaky sea salt (like Maldon) and freshly ground black pepper just before serving. This adds a beautiful finishing touch and enhances flavor.
-
Consider a Higher Roast Temp for Extra Crispy: If you love your cauliflower really crispy and slightly charred, you can increase the oven temperature to 425°F (220°C) and reduce the cooking time slightly, keeping a close eye on it to prevent burning.
-
Make Ahead (Partially): You can wash and cut the cauliflower and mushrooms ahead of time and store them in separate airtight containers in the refrigerator for up to 2 days. You can also make the garlic butter mixture a day in advance and store it in the fridge; gently rewarm it before tossing with the vegetables.
-
Don’t Be Afraid of Browning: Those slightly browned, almost charred bits on the cauliflower and mushrooms are where a lot of the flavor is concentrated. Don’t mistake them for burnt! They indicate proper caramelization and add a wonderful depth of taste.
-
Serving Warm is Key: Like most roasted vegetables, this dish is best served immediately after it comes out of the oven. The textures are at their prime – tender-crisp cauliflower and juicy, earthy mushrooms.
Recipe FAQs
Here are answers to some common questions you might have about making Garlic Butter Cauliflower & Mushrooms.
Q: Can I use frozen cauliflower or mushrooms?
A: While fresh is always recommended for the best texture and flavor, you can use frozen cauliflower. Do not thaw it first; roast it directly from frozen, but be aware it will release more water and might take longer to cook and be less crispy. Frozen mushrooms are generally not recommended for roasting as they tend to become very watery and soggy.
Q: How can I make this dish vegan or dairy-free?
A: Absolutely! Simply substitute the unsalted butter with a good quality plant-based butter (like almond or soy-based butter) or use an additional 2-3 tablespoons of olive oil. Ensure any optional cheese toppings are also dairy-free or omitted.
Q: What if I don’t have fresh garlic?
A: You can use garlic powder as a substitute. As a general rule, 1/4 teaspoon of garlic powder is equivalent to 1 clove of fresh garlic. Adjust to your taste, but fresh garlic provides a superior flavor.
Q: Can I add other vegetables to this dish?
A: Yes, this recipe is very adaptable! Broccoli, bell peppers, asparagus, or Brussels sprouts would all roast well with similar cooking times. Just ensure they are cut into uniform, bite-sized pieces and don’t overcrowd the pan.
Q: How do I store leftovers?
A: Store any leftover garlic butter cauliflower and mushrooms in an airtight container in the refrigerator for up to 3-4 days.
Q: How do I reheat leftovers?
A: The best way to reheat is in the oven or an air fryer to help them regain some crispness. Spread them on a baking sheet and reheat at 350°F (175°C) for 10-15 minutes, or until heated through. You can also microwave them, but they will be softer.
Q: My vegetables are soggy. What went wrong?
A: The most common reasons for soggy vegetables are:
* Overcrowding the pan: Not enough space for moisture to evaporate, leading to steaming.
* Not drying the vegetables: Excess surface moisture prevents browning.
* Oven temperature too low: Vegetables cook slowly without caramelizing.
Q: Can I prepare this in an air fryer?
A: Yes! An air fryer works wonderfully for this dish. Toss the cauliflower and mushrooms as directed. Work in batches to avoid overcrowding the air fryer basket. Cook at 375°F (190°C) for 15-20 minutes, shaking the basket every 5 minutes, until tender-crisp and browned. Cooking time will vary by air fryer model.
Q: Is this dish suitable for meal prepping?
A: Yes, it is! While best fresh, it reheats well. You can make a large batch and portion it out for lunches throughout the week, either on its own or as part of a larger meal with protein and grains.