Introduction
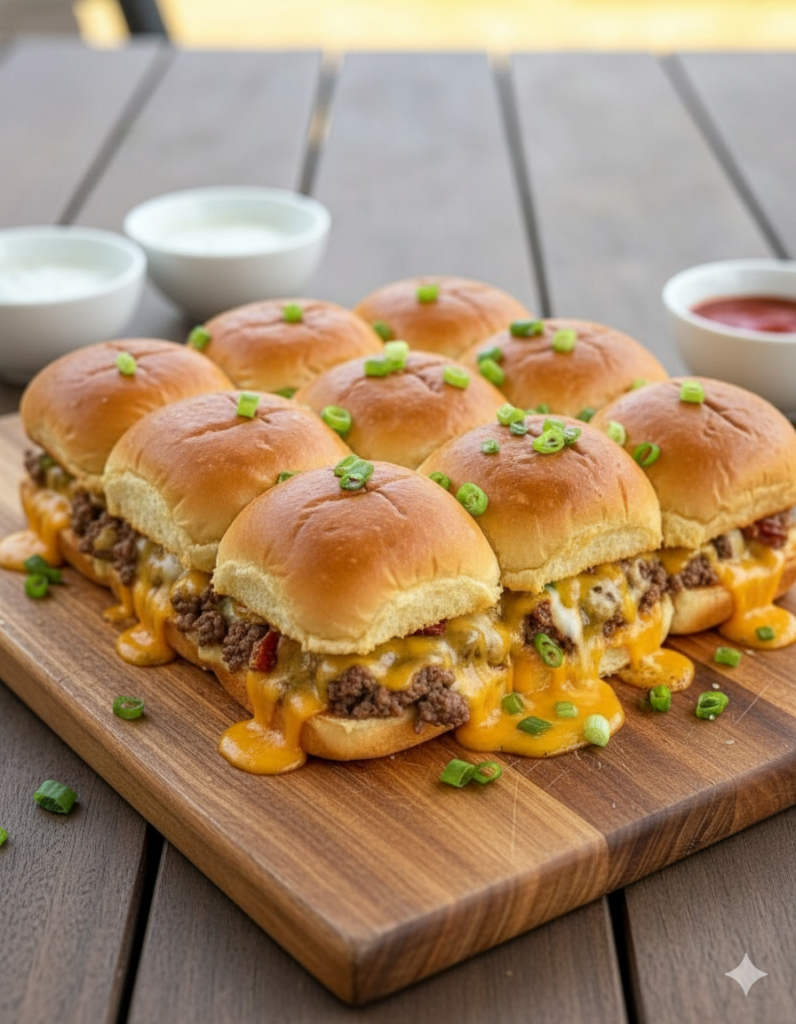
Get ready to experience the beloved flavors of a classic bacon cheeseburger in an irresistible, miniature form! Bacon Cheeseburger Sliders are the epitome of comfort food, perfectly portioned for parties, game days, or a fun family meal. These aren’t just small burgers; they’re an explosion of savory ground beef, crispy bacon bits, gooey melted cheese, and fresh toppings, all nestled within soft, toasted Hawaiian rolls. Designed for maximum flavor and minimum fuss, these sliders are guaranteed to be a hit, delivering that satisfying diner taste with every delightful bite. Prepare to make these a staple in your entertaining repertoire!
Ingredients
To assemble these incredibly delicious Bacon Cheeseburger Sliders, you’ll need a combination of fresh ground beef, savory bacon, a generous amount of cheese, and the perfect soft rolls, along with a few key seasonings and fresh garnishes.
For the Meat Mixture:
-
1 lb (approx. 450g) lean ground beef (80/20 or 85/15 recommended for flavor)
-
6-8 slices thick-cut bacon, diced into small pieces
-
1/2 large onion, finely diced (optional, but highly recommended for flavor)
-
1 tablespoon olive oil (if needed for sautéing onion/bacon)
-
1 teaspoon garlic powder
-
1 teaspoon onion powder
-
1/2 teaspoon smoked paprika (optional, for extra depth)
-
Salt and freshly ground black pepper to taste
-
1 tablespoon Worcestershire sauce (optional, for umami boost)
For the Sliders:
-
12 Hawaiian sweet rolls (King’s Hawaiian brand, often found in a 12-pack)
-
1 1/2 cups shredded sharp cheddar cheese (or a cheddar-jack blend)
-
1/2 cup mayonnaise (for spreading on rolls, or as a base for special sauces)
-
2 tablespoons butter, melted (for brushing the tops of the rolls)
Optional Toppings & Serving Suggestions:
-
Diced green onions or chives (for garnish)
-
Ranch dressing (for drizzling)
-
Ketchup
-
Mustard (Dijon or yellow)
-
Pickle slices (dill or bread and butter)
-
Tomato slices, thinly sliced
-
Shredded lettuce
-
Extra shredded cheese for garnish
-
Jalapeño slices (fresh or pickled)
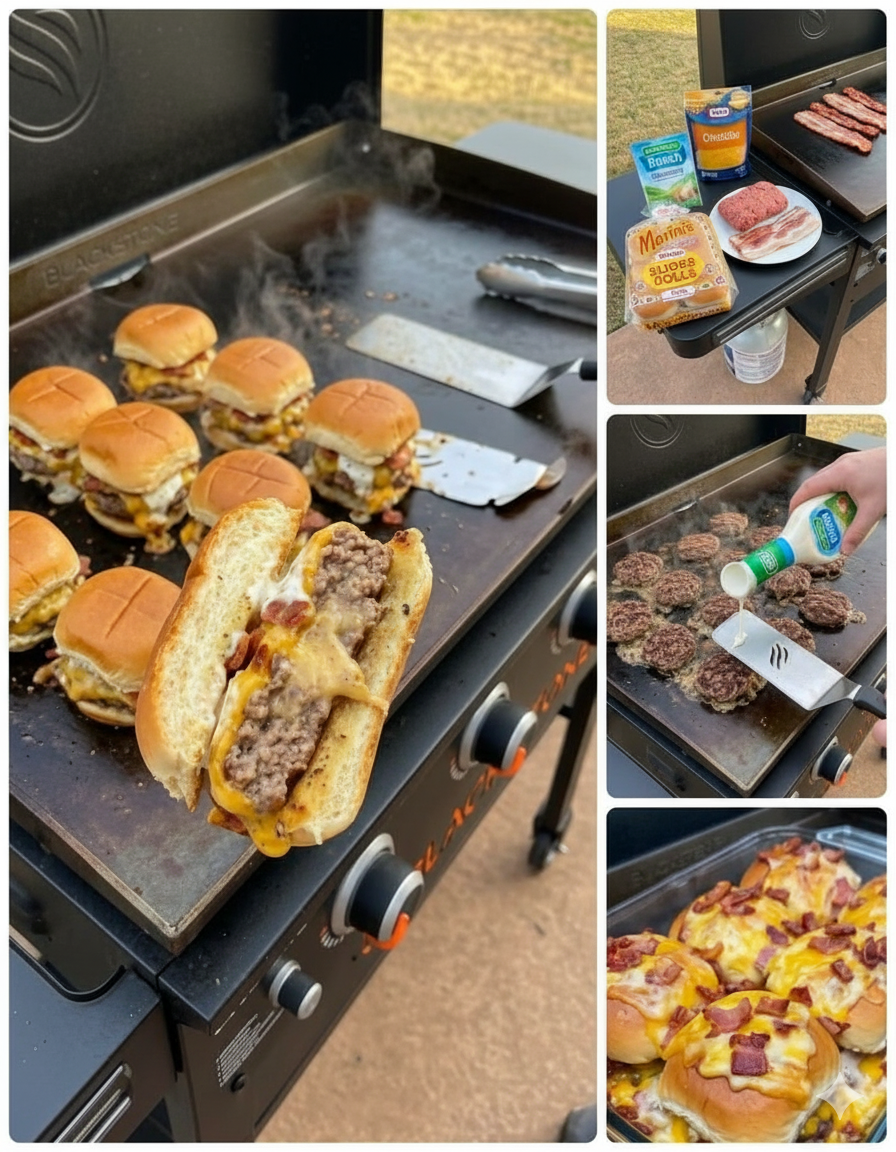
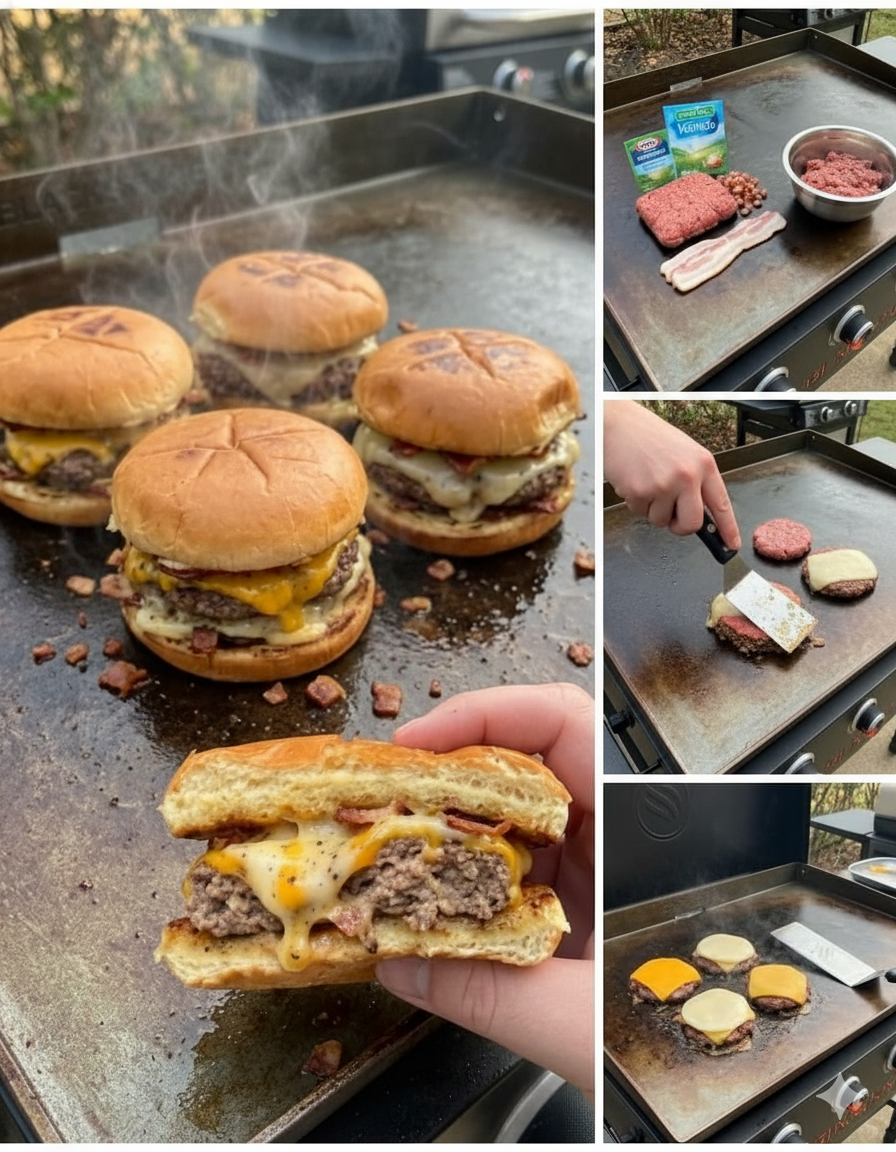
How To Make Bacon Cheeseburger Sliders
Crafting these irresistible sliders is a fun and surprisingly quick process, especially if you’re cooking on a griddle. We’ll break it down into a few key steps to ensure maximum flavor and gooey deliciousness.
Step 1: Prepare and Cook the Bacon
-
Dice the Bacon: Lay the bacon slices on a cutting board and dice them into small, 1/4 to 1/2-inch pieces.
-
Cook the Bacon: Heat a large skillet or a flat-top griddle over medium heat. Add the diced bacon and cook, stirring occasionally, until crispy and golden brown. This usually takes 5-8 minutes.
-
Drain Excess Fat: Once crispy, remove the bacon pieces with a slotted spoon and transfer them to a plate lined with paper towels to drain excess fat. Reserve about 1-2 tablespoons of the rendered bacon fat in the pan/griddle. This fat will be used to cook the beef and impart amazing flavor. Discard any remaining fat or save it for another use.
Step 2: Cook the Ground Beef Mixture
-
Sauté Aromatics (Optional): If using diced onion, add it to the reserved bacon fat in the skillet/griddle. Cook over medium heat for 3-5 minutes until softened and translucent.
-
Brown the Ground Beef: Add the ground beef to the pan with the bacon fat (and onions, if using). Break up the beef with a spatula and cook, stirring frequently, until it is fully browned and no pink remains.
-
Drain Fat (if necessary): If there’s a significant amount of grease, carefully drain most of it, leaving just a little for flavor.
-
Season the Beef: Add the garlic powder, onion powder, smoked paprika (if using), salt, black pepper, and Worcestershire sauce (if using) to the cooked beef. Stir well to combine, ensuring the beef is evenly seasoned. Cook for another 1-2 minutes to allow the spices to bloom.
-
Combine with Bacon: Stir the cooked crispy bacon pieces back into the seasoned ground beef mixture. Keep warm over very low heat or remove from heat and set aside while you prepare the rolls.
Step 3: Prepare the Hawaiian Rolls
-
Slice the Rolls: Take the block of Hawaiian rolls and, using a large serrated knife, carefully slice them horizontally in half, keeping all the rolls connected. You’ll have a top section and a bottom section.
-
Prepare the Bottom Buns: Place the bottom half of the rolls onto a baking sheet or directly onto your griddle (if you have space and are cooking everything there). If using a baking sheet, you may want to line it with parchment paper for easier cleanup.
-
Spread Mayonnaise (Optional): Lightly spread mayonnaise on the cut side of the bottom buns. This adds flavor and acts as a barrier to prevent sogginess.
Step 4: Assemble and Cook the Sliders
-
Layer the Filling:
-
Evenly spread the hot ground beef and bacon mixture over the bottom half of the Hawaiian rolls.
-
Generously sprinkle the shredded cheddar cheese (or cheddar-jack blend) over the meat mixture.
-
-
Add Top Buns: Place the top half of the Hawaiian rolls directly over the cheese-covered meat.
-
Brush with Butter: Melt 2 tablespoons of butter and brush it evenly over the tops of the slider buns. This will give them a beautiful golden crust.
-
Cook the Sliders:
-
Griddle Method: If cooking on a griddle, place the assembled sliders (on the baking sheet if using, or directly) over medium-low heat. Cover with a dome lid or a large metal bowl to trap heat and help the cheese melt quickly. Cook for 5-8 minutes, or until the cheese is gloriously melted and gooey, and the rolls are warm and lightly toasted.
-
Oven Method: Preheat your oven to 350°F (175°C). Place the assembled sliders (on a baking sheet) into the preheated oven. Bake for 10-15 minutes, or until the cheese is melted and bubbly, and the tops of the rolls are lightly golden. For an extra golden top, you can broil for the last minute, watching very carefully to prevent burning.
-
-
Garnish and Serve: Once the cheese is melted, remove the sliders from the heat. Garnish generously with diced green onions or chives, and a drizzle of ranch dressing if desired. Use a spatula to carefully lift the entire block of sliders, or separate them along the perforations. Serve immediately with your favorite condiments and extra toppings.
You Must Know
Achieving perfectly delicious Bacon Cheeseburger Sliders consistently requires attention to a few critical details. These insights will help you elevate your sliders from good to unforgettable.
-
The Importance of Bacon Fat: Don’t discard all the rendered bacon fat! Reserving a tablespoon or two to cook the ground beef is a game-changer. It infuses the beef with an incredible smoky, savory flavor that’s essential to the “bacon cheeseburger” experience. However, do drain off excessive fat to avoid a greasy end product.
-
Quality Ground Beef: Opt for ground beef with an 80/20 or 85/15 lean-to-fat ratio. The fat content is crucial for flavor and moisture in burgers. Leaner beef can result in dry sliders. Crumble the beef well as it cooks to ensure it’s evenly cooked and easy to portion on the rolls.
-
Seasoning the Meat: Don’t underestimate the power of seasoning! Beyond salt and pepper, garlic powder, onion powder, and a touch of smoked paprika or Worcestershire sauce will significantly enhance the depth of flavor in your beef mixture, mimicking that classic burger taste.
-
Hawaiian Rolls are Non-Negotiable (Almost): King’s Hawaiian sweet rolls are specifically recommended for this recipe. Their inherent sweetness, soft texture, and ability to stay connected in a block make them ideal for sliders. They toast beautifully and hold up well to the filling without becoming soggy. While other dinner rolls can work, they won’t provide the same iconic sweetness or texture.
-
Pre-Slicing the Rolls: Slicing the entire block of rolls in half horizontally at once is key. It makes assembly incredibly fast and ensures each slider has a top and bottom bun that fits perfectly.
-
The Mayonnaise Barrier (Optional but Recommended): A thin layer of mayonnaise spread on the cut side of the bottom buns serves two purposes: it adds a subtle creaminess and flavor, and more importantly, it creates a barrier that helps prevent the rolls from absorbing too much moisture from the meat and becoming soggy.
-
Cheese Selection and Quantity: Use cheese that melts well, like shredded sharp cheddar, Monterey Jack, or a cheddar-jack blend. Shred your own cheese if possible; pre-shredded varieties often contain anti-caking agents that can inhibit smooth melting. Don’t be shy with the cheese – it’s a cheeseburger slider, after all!
-
Heat Control for Melting and Toasting: Whether you’re using a griddle or an oven, maintain medium-low to medium heat. You want the cheese to melt slowly and gloriously while the rolls get warm and lightly toasted, not burnt. If using a griddle, covering the sliders with a dome or large bowl helps trap heat and speeds up the melting process.
-
Immediate Serving for Best Results: Sliders, especially those with melted cheese, are best enjoyed hot and fresh. The cheese will be at its peak gooeyness, and the rolls will be perfectly warm and soft. While leftovers are tasty, the texture won’t be quite the same.
-
Garnishes are Key: Don’t skip the fresh garnishes like diced green onions or chives. They add a pop of color, a hint of freshness, and an extra layer of flavor that brightens the rich, savory sliders.
By keeping these “must-knows” in mind, you’ll be well on your way to crafting a batch of Bacon Cheeseburger Sliders that will impress everyone.
Topping Variations
The beauty of Bacon Cheeseburger Sliders lies not only in their core ingredients but also in the endless possibilities for customization through toppings. While the base is classic, here are numerous ways to put your own spin on them, offering a variety of flavors and textures.
-
Classic Burger Toppings:
-
Pickles: Dill pickle chips or sweet bread and butter pickles add a crucial tangy crunch. A must-have for many burger lovers.
-
Onions: Beyond the optional diced onion in the meat, thinly sliced red onion (raw or pickled) offers a sharp bite. Caramelized onions add a sweet, savory depth.
-
Lettuce & Tomato: Shredded iceberg lettuce provides a cool crispness, while thin slices of ripe tomato add freshness and a hint of acidity.
-
Ketchup & Mustard: Classic condiments for a reason! Yellow mustard, Dijon mustard, or a gourmet stone-ground mustard can all work.
-
-
Creamy & Tangy Enhancements:
-
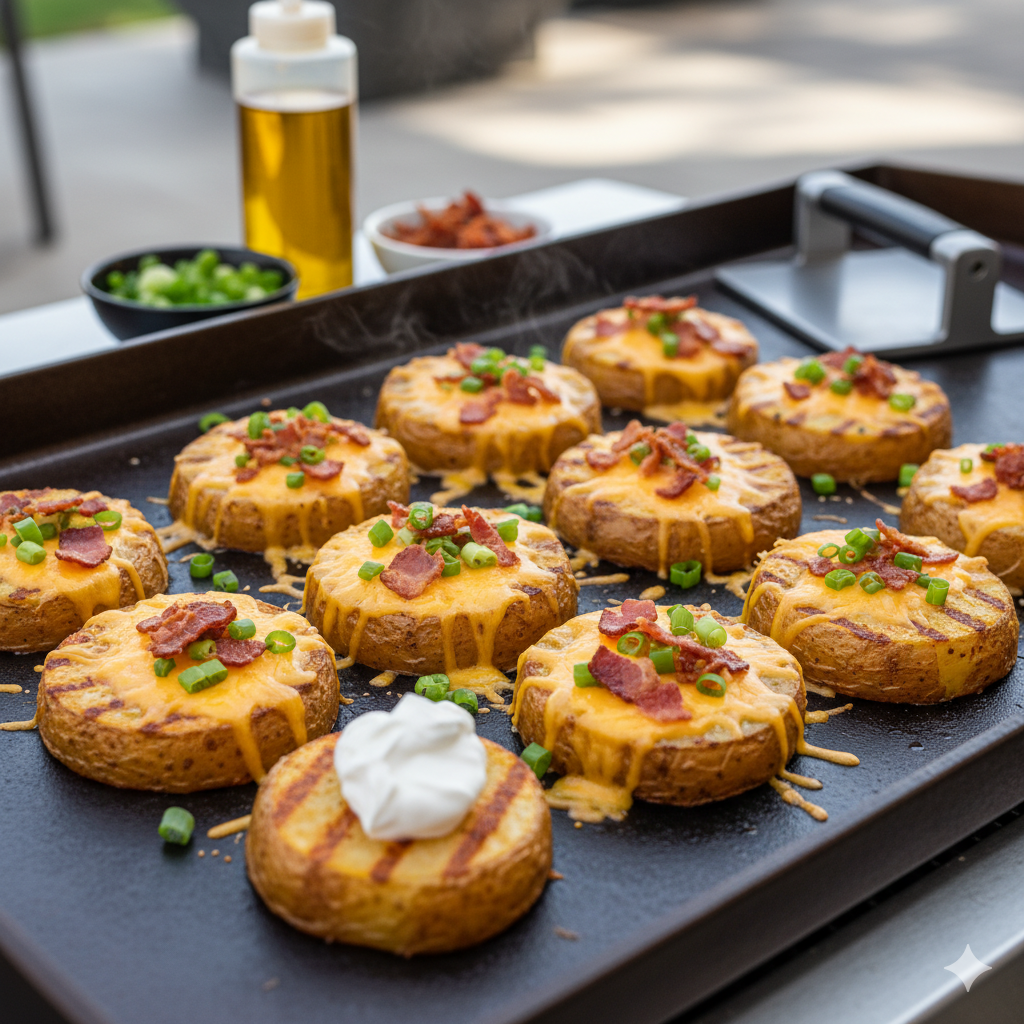
Ranch Dressing: A drizzle of ranch (as shown in your image) adds a creamy, herb-infused tang that pairs wonderfully with bacon and cheese.
-
Special Sauce: Create a “secret sauce” by mixing mayonnaise, ketchup, relish, a dash of hot sauce, and a pinch of sugar. This is reminiscent of popular fast-food burger sauces.
-
Sour Cream/Greek Yogurt: A dollop of plain sour cream or Greek yogurt can offer a cool, creamy contrast, especially if you add spicy elements.
-
Avocado/Guacamole: Creamy avocado slices or a spoonful of fresh guacamole adds healthy fats and a luxurious texture.
-
-
Spicy Kicks:
-
Jalapeños: Freshly sliced jalapeños offer a crisp, bright heat. Pickled jalapeños provide a tangier spice.
-
Sriracha Mayonnaise: Mix sriracha with mayonnaise for a spicy, creamy spread.
-
Chipotle Aioli: Mayonnaise blended with chipotle peppers in adobo sauce gives a smoky, spicy kick.
-
Hot Sauce: A few dashes of your favorite hot sauce (Tabasco, Cholula, etc.) can be added directly to the meat or drizzled on top.
-
-
Extra Cheese & Savory Elements:
-
Blue Cheese Crumbles: For a bolder flavor, sprinkle blue cheese crumbles over the hot meat mixture before adding the top buns.
-
Pepper Jack Cheese: Swap out cheddar for pepper jack for a spicy cheese element.
-
Crispy Fried Onions: Store-bought crispy fried onions (like those used for green bean casserole) add an amazing texture and savory onion flavor.
-
Fried Egg: For a brunch-inspired slider, top with a small fried quail egg or a small fried chicken egg. The runny yolk adds instant richness.
-
BBQ Sauce: A smoky, sweet, or tangy BBQ sauce can be spread on the buns or mixed into the meat for a BBQ burger style slider.
-
-
Fresh & Herbaceous:
-
Fresh Herbs: Diced chives or parsley sprinkled on top add freshness and color.
-
Scallions/Green Onions: (As shown in your image) provide a mild, fresh onion flavor and a beautiful green garnish.
-
When planning your toppings, consider having a “slider bar” where guests can customize their own, especially if you’re making a large batch for a gathering. This ensures everyone gets their perfect bite!
Make It A Meal
While Bacon Cheeseburger Sliders are undeniably satisfying, transforming them into a complete and balanced meal involves pairing them with well-chosen side dishes. Think about complementary flavors, contrasting textures, and adding some vegetables to round out the meal.
-
Classic Comfort Sides:
-
French Fries or Onion Rings: The quintessential burger companions! Crispy golden fries (regular, sweet potato, or waffle) or savory onion rings are always a crowd-pleaser and provide that satisfying crunch.
-
Tater Tots: A fun, nostalgic option that’s easy to bake alongside your sliders.
-
Potato Salad: A creamy, hearty potato salad (classic American, German, or a dill-infused version) makes for a substantial and comforting side.
-
Macaroni Salad: Similar to potato salad, a tangy macaroni salad is a great choice for picnics or casual gatherings.
-
-
Fresh & Lighter Options:
-
Coleslaw: A vibrant, crunchy coleslaw (creamy or vinegar-based) cuts through the richness of the sliders, adding freshness and a delightful tang.
-
Garden Salad: A simple green salad with a light vinaigrette is an excellent way to add fresh vegetables and a crisp contrast.
-
Tomato and Cucumber Salad: A refreshing salad with diced tomatoes, cucumbers, red onion, and a simple lemon-herb dressing.
-
Corn on the Cob: Grilled or boiled corn on the cob, especially with a sprinkle of chili-lime seasoning, is a sweet and juicy addition.
-
Watermelon Slices: For a summer meal, the coolness and sweetness of watermelon provide a refreshing palate cleanser.
-
-
Baked & Roasted Veggies:
-
Roasted Asparagus or Broccoli: Simple roasted green vegetables seasoned with garlic, salt, and pepper make a healthy and delicious accompaniment.
-
Baked Beans: Hearty, sweet, and savory baked beans (homemade or doctored-up canned) are a traditional BBQ side that pairs wonderfully.
-
Corn and Black Bean Salsa/Salad: A chunky salsa or salad made with corn, black beans, red onion, cilantro, and lime juice offers a fresh and flavorful option.
-
-
Soup or Chili (for colder weather):
-
Chili: A warm bowl of beef chili (with or without beans) alongside sliders can make for a very satisfying and hearty meal, especially when the weather turns cool.
-
Tomato Soup: For a slightly lighter but still comforting option, a classic creamy tomato soup offers a nice contrast.
-
-
Beverage Pairings:
-
Milkshakes: Go all-out American diner style with classic chocolate, vanilla, or strawberry milkshakes.
-
Iced Tea or Lemonade: Refreshing choices for any time of year.
-
Craft Beer: For adults, a crisp lager, an amber ale, or even a session IPA would pair well with the savory flavors of the sliders.
-
When planning your meal, consider the occasion. For a casual gathering, a couple of classic sides like fries and coleslaw might be perfect. For a family dinner, adding a simple green salad and some roasted veggies can create a more balanced meal.
Pro Tips for Slider Success
To take your Bacon Cheeseburger Sliders from great to absolutely legendary, consider these professional tips that cover everything from preparation to presentation.
-
Don’t Rush the Bacon: Crispy bacon is non-negotiable for these sliders. Cook it slowly over medium heat, stirring frequently, to ensure it’s evenly rendered and perfectly crisp without burning. This also allows you to extract maximum flavor from the fat.
-
Even Beef Crumble: When browning your ground beef, use your spatula to break it into small, uniform crumbles. This ensures even cooking and makes the beef easier to layer neatly on the small rolls. Small crumbles also mean every bite has meat, cheese, and bacon.
-
Season in Layers: Don’t just season the beef; consider adding a little salt and pepper to the cut side of the buns before adding the filling, or mixing some dried herbs into the melted butter for the top. Layered seasoning builds deeper flavor.
-
The Butter Brush: Brushing the tops of the Hawaiian rolls with melted butter is a small step with a big impact. It helps the rolls toast to a beautiful golden brown, adds a rich flavor, and makes them look incredibly appealing. You can even mix garlic powder or a pinch of onion powder into the melted butter for an extra savory kick.
-
Griddle vs. Oven for Melting:
-
Griddle: Ideal for speed and a slight crispness on the bottom of the rolls. Using a dome lid is crucial here to trap heat and ensure the cheese melts quickly and evenly without overcooking the buns.
-
Oven: Great for cooking a larger batch simultaneously and ensuring all the cheese melts uniformly. It’s a more hands-off approach. Broiling for the last minute (watch carefully!) can give you a fantastic golden-brown top.
-
-
Cheese Distribution is Key: Spread the shredded cheese evenly over the entire surface of the meat mixture. As it melts, it will create a gooey blanket that holds everything together and prevents dry spots.
-
The “Pre-Moisture” Layer: The mayonnaise on the bottom bun (or even a thin spread of mustard or BBQ sauce) acts as a crucial barrier. It adds flavor but, more importantly, prevents the bottom buns from becoming soggy from the meat’s juices, maintaining that delightful soft-yet-toasted texture.
-
Mind the Temperature for Serving: Sliders are best served piping hot, right when the cheese is at its meltiest. If you’re serving a crowd and need to hold them, cover the baking sheet loosely with foil after removing from the oven/griddle and keep them in a very warm (not hot) oven until ready to serve. They will lose some crispness, but will remain warm and gooey.
-
Cutting with Precision: Use a large, sharp serrated knife to cut the entire block of cooked sliders apart. This helps create clean cuts and prevents tearing the soft rolls or dragging the melted cheese. A pizza cutter can also work well.
-
Presentation Matters: Even for casual sliders, a little effort in presentation goes a long way. Arrange them neatly on a platter, garnish generously with fresh green onions or chives, and serve with an array of colorful dipping sauces and toppings in small bowls. This makes them even more appealing and highlights the effort you put in.
By incorporating these pro tips, you’ll ensure your Bacon Cheeseburger Sliders are not just delicious but also perfectly executed and presented, making them a memorable hit every time.
Recipe FAQs
Even seasoned cooks can have questions when trying a new variation of a classic. Here are some frequently asked questions about making Bacon Cheeseburger Sliders, along with their answers to help ensure your success.
Q1: Can I use ground turkey or chicken instead of ground beef?
A1: Yes, you can! Ground turkey or chicken can be used as a leaner alternative. However, be aware that they have less fat, so the mixture might be a bit drier. To compensate, you might want to add a bit more of the reserved bacon fat, or a tablespoon of olive oil, and ensure you season generously. The flavor profile will also be slightly different but still delicious.
Q2: What if I don’t have a griddle? Can I still make these?
A2: Absolutely! You can cook the bacon and ground beef in a large skillet on your stovetop. For assembling and melting the cheese, simply transfer the prepared bottom buns (with meat and cheese) to a baking sheet, add the top buns, brush with butter, and bake in a preheated oven at 350°F (175°C) for 10-15 minutes, or until the cheese is melted and bubbly.
Q3: How can I make these sliders spicier?
A3: There are several ways to add heat:
-
Mix a pinch of cayenne pepper or red pepper flakes into the ground beef while seasoning.
-
Add finely diced fresh jalapeños or serrano peppers to the ground beef mixture while it’s cooking.
-
Use Pepper Jack cheese instead of cheddar.
-
Serve with a spicy sauce like sriracha mayo or a chipotle aioli.
-
Garnish with sliced fresh or pickled jalapeños.
Q4: Can I prepare the meat mixture ahead of time?
A4: Yes, you can prepare the seasoned ground beef and bacon mixture ahead of time. Cook it completely, let it cool, and store it in an airtight container in the refrigerator for up to 2-3 days. When ready to assemble, gently reheat the mixture in a skillet or microwave before spreading it on the rolls.
Q5: My Hawaiian rolls became soggy on the bottom. How can I prevent this?
A5: Soggy bottoms usually occur if the rolls absorb too much moisture from the meat. Here are solutions:
-
Drain the beef well: Ensure you drain off most of the excess fat/liquid from the cooked ground beef mixture.
-
Mayonnaise/Sauce barrier: A thin layer of mayonnaise (or another thick spread like mustard) on the cut side of the bottom bun acts as a barrier.
-
Serve immediately: Sliders are best enjoyed hot and fresh. The longer they sit, the more likely the buns are to absorb moisture.
Q6: Can I use different types of cheese?
A6: Absolutely! While sharp cheddar is classic, feel free to experiment. Monterey Jack, Colby Jack, American cheese slices (which melt exceptionally well), pepper jack, or a mild provolone would all work wonderfully. The goal is a good melting cheese.
Q7: How many sliders does this recipe make, and can I scale it?
A7: This recipe typically makes 12 sliders, based on a standard 12-pack of Hawaiian rolls and 1 lb of ground beef. It is very easy to scale up or down. Simply adjust the quantities of all ingredients proportionally based on the number of sliders you want to make. If doubling, consider using two baking sheets or cooking in batches on your griddle.
Q8: What’s the best way to transport these for a party?
A8: If transporting, it’s best to cook them shortly before you leave. Assemble and bake/griddle them, then transfer the entire block of sliders (still on the baking sheet if possible) to an insulated carrier or keep them warm in a portable food warmer. Alternatively, cook the meat and prepare all toppings separately, and assemble them fresh at your destination.
Q9: Can I add vegetables to the meat mixture?
A9: Yes! Finely diced bell peppers (red, green, or yellow), minced mushrooms, or even a handful of finely chopped spinach can be sautéed with the onions and beef to add extra flavor and nutrients. Just make sure they are well-cooked and any excess moisture is evaporated to prevent a soggy filling.
Q10: What if I don’t like Hawaiian sweet rolls?
A10: While Hawaiian rolls are iconic for their sweetness and texture in this recipe, you can substitute them with other soft dinner rolls or small brioche slider buns. Keep in mind the flavor profile will be less sweet, so you might adjust other elements like adding a touch of brown sugar to the beef seasoning or a slightly sweeter sauce.
Enjoy your amazing Bacon Cheeseburger Sliders!